Contents
Are you considering making hardtack to carry with you on your outdoor adventures?
This is a superb idea as it ensures that you have a great survival food that stays edible for a long time provided you make sure to store it in a dry place.
Not only do you have a long-lasting food item to carry with you in the wilderness, but also an inexpensive one – something that every outdoorsman or survivalist wants.
Because they are so hard, there were several alternative names given to hardtack, including tooth dullers and sheet iron. They do not sound very appetizing, do they?
Well, whatever you call it, hardtack is an excellent food item to pack for outdoor trips, and you will find that it is quite easy to eat when you crumble it into soup, cocoa, or coffee or when you cook it with other foods.
The History of Hardtack
Hardtack is a popular kind of biscuit or cracker that is made of water, flour, and sometimes, a bit of salt. Because it is not just inexpensive and long-lasting, but also quite tasty.
This hard cracker is the food that is often used as sustenance when there is a shortage or absence of regular perishable foods. It is commonly used during military campaigns, land migrations, and sea voyages.
The name ‘hardtack or hard tack’ is derived from the term “tack”, which is a slang used for food by British sailors.
Apart from sheet iron and tooth dullers, it is also known by other names such as ship’s biscuit, sea biscuit, pilot bread, cabin bread, sea bread, soda crackers, and other pejorative names like worm castles, molar breakers, and dog biscuits. It does not taste like a banana split but it will keep you alive.
Centuries ago, some physicians associated with digestion with most medical issues. Therefore, for health and sustenance, it was considered good for one’s constitution to eat one biscuit a day.
Biscuits were made as hard as possible by bakers of the time because the biscuits would become soft and more palatable with time as they were exposed to humidity and other elements of the weather.
Because of its hardness and dryness, hardtack can survive extreme temperatures and rough handling when properly stored and transported.
The captain’s biscuit, which was more refined than the one rationed to sailors, was made with finer flour.
To make it soft, hardtack was often dunked in coffee, brine or some other liquid, or it was cooked into a skillet. If kept dry, it could stay hard intact for several years because it was baked hard. It was baked 4 times instead of two for long voyages and prepared 6 months before sailing.
The daily allowance on board a Royal Navy ship in 1588 (which was long before Star Wars punched itself in the gut with The Force Awakens) was 1 pound of hardtack and 1 gallon of small beer.
This biscuit remained an important part of the diet of the Royal Navy sailor until canned foods came along.
On top of this, from the late 1700s, hardtack was crumbled or pounded fine and was used as a thickener, making it an integral ingredient in seafood chowders in New England.
The Traditional (Civil War) Hardtack Recipe
Why It is Still Considered the Best

The ancient Romans consumed hardtack, and Nelson’s troop stored thousands of the hard biscuits in barrels in their naval vessels.
Hardtack was also a staple ration for American soldiers of the Civil War. It was called by different names in different parts of the world, but for centuries, the basic recipe has been a staple for militaries across the globe.
The hardtack that was made during the Civil War was simple and easy to make.
It was baked with a mixture of flour and water, and sometimes a small amount of salt or sugar. The result was a sturdy and filling biscuit that lasted many years if kept dry.

This is why the Civil War or traditional hardtack recipe is still considered the best. After the war, some soldiers kept a few of the biscuits as souvenirs, and now after 150 years, you will often find them displayed in Civil War museums.
Mixing the Ingredients
To make hardtack, you will need:
• 2 cups of white flour
• 1/2 to 3/4 cup of water
• 1/2 tablespoon of salt (optional)
• Mixing bowl
• Rolling pin
• 1 cookie sheet
• Knife
• Common nail (make sure that it is clean)
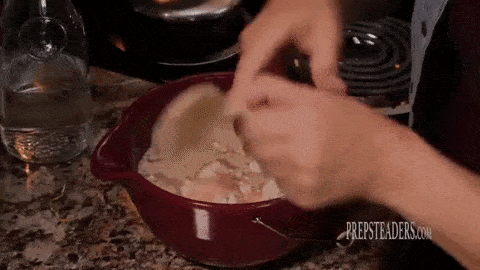
The first step is to preheat your oven to 375 degrees Fahrenheit. Next, take the flour and salt (if you wish to add salt) and combine them in a mixing bowl.
Once you have mixed your dry ingredients well, add the water in small amounts. You can mix and knead the dough using your hands or your stand mixer’s bread hood attachment.
However, remember that back in the day, bakers used nothing but their hands to make hardtack. Yes, it will be extremely sticky in the beginning, but once you properly mix and knead, the dough will quickly become uniform and perfect.
If you still find the dough sticky after kneading for several minutes, simply add a small amount of extra flour. Once you form a solid ball with your dough, dust your work surface with flour and place it on top.
Tip: If you have any rings on your fingers, you should definitely take them off because hardtack dough is extremely sticky. You will more than likely struggle to clean your rings later, so get them off before you start mixing your dough.
Rolling the Dough
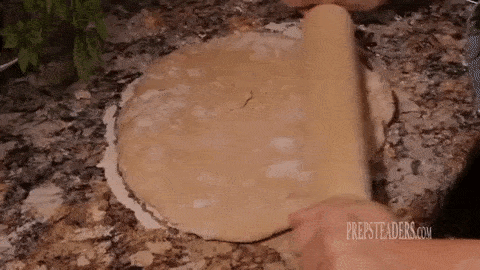
The next step is to roll your dough. You can do the job with a rolling pin, or if you do not have one, an empty wine bottle, a heavy pint glass or even your hands.
Roll the dough out to approximately a thickness of 1/4 to 1/2 inches. You will find it easier to roll your dough if you form it into a rough square instead of a pizza crust circle.
If you do not have much experience using a rolling pin, you can use pencils to guide you. All you have to do is lay a pencil on either side of the dough and press them down until your rolling pin rests on the pencils.
Now, you will get a nice flat piece of dough by rolling your pin back and forth. You should make sure that your dough is flat and even to get evenly cooked hardtack.
Cutting the Dough

When you are happy with the shape of your dough, place it on the cookie sheet. The next thing you need to do is cut the dough into manageable “cracker” size pieces with a dough-cutting blade or a knife.
Ideally, you want your biscuits to be roughly the size of a graham cracker or saltine. Why?
Well, this is because this is the best size for long-term storage. It also makes a good size for serving at a later time and just make sure you don’t eat as much as Dan and Roseanne Conner – that’s just not healthy.
If you choose to soak and soften your hardtack in coffee or soup, you should cut your dough into pieces that will fit your mug.
Cutting the dough is easy so you are not likely to have any trouble with the job. All you have to do is cut your dough into the perfect size for storage and to fit the container and of course, your mug.
Poking the Crackers

Once you are done cutting the dough into the desired size, the next step is to poke holes. This is where the nail comes in. All you need to do is poke small holes that are evenly spaced across each piece.
Poking holes is an important step as they help the biscuit bake evenly. Ideally, you want both the middle and the edges of the hardtack to have a consistent bake.
The holes allow for more moisture escape during the baking process and prevent the dough from rising in the oven. On top of this, the holes make the hard biscuits easier to break into smaller pieces for eating later.
Obviously, you do not HAVE to use a nail to poke holes on the crackers. If you have any other tool that can help with the task, use it. If you do use a nail, be sure to use a new one and clean it properly before you poke the holes.
Baking

Now that you have cut the dough and poked holes into the pieces, you are ready to bake your hardtack biscuits.
Bake them for 25 to 35 minutes in the preheated oven until they just begin to turn brown on the surface. The color you want is a very light tan, not an actual brown. You should pay close attention to your crackers as the flour can get scorched very easily.
Once you have a light tan color, remove your hardtack crackers from the oven and allow them to cool completely.
It is important to make sure that they are 100% cool before you store them in any package or container so that moisture is removed properly from the biscuits.
Keep in mind that any bit of excess moisture can result in premature spoilage of your hardtack. So, if you experience very dry climate in your area, just leave your survival biscuits out for as long as possible to dry a little more before you store them away.
Other Ingredients You Can Add to Hardtack
As mentioned earlier, traditional or Civil War hardtack is made with flour, water, and a bit of salt at times. The basic recipe that pioneers used has endured through the centuries and is still considered to be the best.
However, there are also modern hardtack recipes that add different ingredients to the original one. Some recipes add sugar, brown sugar, sweet sorghum flour, nutritional yeast, coconut oil, butter, or highly refined oils with long shelf lives.
Those who are lactose intolerant use dried buttermilk powder. Other ingredients you can add for flavor are carob or cocoa powder.
You should keep in mind that adding ingredients beyond the traditional flour, water, and salt can have an effect on the hardtack’s shelf life.
However, this can be quite minuscule with vacuum sealing. You should remember never to add animal fats like tallow or lard as these ingredients are more likely to go rancid.
How to Eat Hardtack

As you already know, hardtack is incredibly hard. It was made to be so because it was stored for extended periods, even many years, for long wars, voyages, etc. This makes the crackers extremely difficult to eat. So, how do you actually eat hardtack?
Hardtack was meant to be eaten with some sort of beverage or liquid. If you have tried eating one, then you know that they are not kidding when they say it is HARD!
Many years ago, people put their hardtack in their mouths until it was softened by their saliva and they could swallow it. However, the best thing to do is soak it in a mug of coffee, tea, milk, soup, broth or any other liquid you have on hand.
Remember that this biscuit can actually cause harm or damage to your mouth or teeth if you are not cautious when eating it. In the world of hardtack, your best friend is broth or some type of hot beverage.
Proper Ways to Store Hardtack

One of the best things about hardtack is that you can store it for many months or even years. The most important thing to do is to make sure that it remains dry. This means storing it properly.
When storing hardtack, using Mylar bags and desiccants or vacuum sealing is a great way to remove moisture and keep it away. After putting your biscuits in a sealed or Mylar bag, you should store it in a metal container so that rodents do not get to them.
When you store your hardtack biscuits, you should make sure that the individual packages are kept small. This way, you only open what you need and keep the remaining hardtack safe and dry.
You should also store the container of hardtack in a cool, dry place. Again, you need to make sure that the hardtack is dry and free from any moisture when you store it because this is the only way to make sure that it lasts.
Thinking about the Future
If you are an outdoor enthusiast or go on adventures in the wilderness for long periods, you should definitely have hardtack with you.
This is a handy food to have along with perishables as they last a very long time and can sustain you when you run out of food. Jack Bauer would approve of it!
Hardtack is easy to make and can be stored for many years so you can have an extra food item to carry no matter when you decide to go off on an outdoor trip.
When you want the best survival food, there is nothing like hardtack. You should definitely bake a couple of batches today – you never know when you might need it!


375 degrees Celsius ???? fahrenheit… you mean
Two things, as a reenacort of many years and the ‘cook’ for my unit, I have learned much about Hardtack.
one, twice bake it. First bake a around 200 degrees till it toasts. remove and cool, then bake again at as low as your oven will go to dry.
two, dipping a hardtack in a hot drink only makes it slimy, it will not soften it, Boiling it hardly does either. Best we found is to fry it in an oil or, yum, bacon fat.