
Table of Contents
Introduction
 In this series, we will walk you through the necessary steps required to ensure that you are prepared in the event of a catastrophic disaster. If you think about it for a short amount of time, you will be surprised by the numerous steps you can come up with on your own to provide the best chance for you, your family, and friends-often called “your party”-to come out the other side of a disaster healthy and whole.
However, just because you feel confident in your abilities to work through this type of problem on your own does not mean you have accounted for the litany of potential issues that can bring everything to a crashing halt. That is why we have developed this series: to help guide you from random Joe Schmo to master prepper in no time.
The amount of information you need know at the drop of a hat can be staggering. If a disaster were to happen, you might know where you would go. You might even know what route you would take.
However, what would you do if your safe spot was not available or if your route was blocked by panicked people all trying to leave at the same time, causing a traffic jam, or worse, an impenetrable wreck. How many alternative plans do you have?
Could you travel on foot? Do you have anyone you want to save that has difficulties moving? What kind of supplies are the most vital yet still compact and lightweight enough to be easily carried? These are the types of questions you need answers to well in advance of actually needing to implement those answers.
That is what this guide sets out to do, and if you follow our advice, you can feel relatively confident that, should disaster strike, you will have a plan of action and be as best prepared for survival as you can.
Bug out Bags Item List
Water
- Canteen
- Drinking Water
- Water Purification Tablets
- Portable Water Filter
- Hydration Bladder
- Collapsible Water Bottle
- Hard Water Bottle
Lighting
- Candles
- LED Headlamp
- Batteries
- Survival Flashlight
- Mini LED Keychain
- Glowstick
Food
- P-38 Can Opener
- Energy Bars
- Small Collapsible Bowl
- Daily Multivitamin Supplement
- Stove Fuel
- Snare Wires
- Metal Cooking Pot
- Yo-Yo Fishing Reels
- Metal Cup
- Portable Stove
- Pot Scrubber
- Freeze Dried Meals
- Dehydrated Meals
- Fishing Pole
- Survival Slingshot
- Spork
- Braided Fishing Line
- Military Meals
- Hook, Swivel, Sinker Set
Heating Source
- FireSteel Fire Starter
- Tinder
- Windproof – Waterproof Lighter
- Tinder
- Small Magnifying Glass
- Waterproof Storage
- Waterproof Survival Matches
Navigation and Communcations
- Small Note Pad and Pencil
- Compass
- Small Signaling Mirror
- Emergency Whistle
- Local Area Map
- Protected Smart Phone
- Two-Way Walkie Talkie Radios
- Crank Power Charger
- Emergency Radio with Hand Crank
Shelter
- Ground Pad
- Tarp
- Zip Ties
- Wool Blanket
- Survival Hammock
- Sleeping Pad
- Bivy
- Paracord Survival Kit
- Tent
- Sleeping Bag
Hygiene items
- Small Pack Towel
- Wet Napkins
- Bandana
- Travel Toilet Paper
- Travel Size Toothbrush & Toothpaste
- Tampons
- Dental Floss
- Hand Sanitizer
- All-Purpose Camp Soap
Miscellaneous
- Garbage Bag
- Survival Watch
- 550 Parachute Cord
- Binoculars
- Drivers License or Passport
- Latex Tubing
- Family Photos
- Mosquito Head Net
- Gas Mask
- Playing Cards
- Resealable Bags
- Electrical Tape
- Rechargeable Batteries
- Sunglasses
- Sewing Kit
- N95 Face Mask
- Fishing Kit
- Cotton Bandana
- Camo Face Paint Sticks
- Carabineers
- Personal Credit Cards
- Duct Tape
- Snare Wire
- Condoms
- Cash
Clothing
- Wool Hiking Socks
- Lightweight Long Sleeve Shirt
- Sewing Kit
- Shemagh
- Rain Poncho with Hood
- Medium Weight Fleece
- Stocking Cap
- Hat w/ Flex Brim
- Rain Poncho
- Fresh Socks
- Hiking pants
- Hiking Boots
- Survival Gloves
- Underwear
- Safety Pins
- Hiking jacket
- Body Warmers
First Aid
- Personal Medications
- First Aid Kit
- Survival Antibiotics
- Pain Killers
- Sun Screen
- Wound Gauze Roll
- Mole Skin Pads
- Surgical Tape
- Neosporin
- Band-Aids
- Blood Clotting Sponge
- Insect Repellant
- Hydrogen Peroxide
- Mylar Survival Blanket
- Sterile Alchohol Prep Pads
- Super Glue
- Tweezers and Nail Clippers
Self-Defense
- Firearm Ammunition
- Pepper Spray
- Takedown Survival Bow
- Pepper Spray
- Handgun
- Takedown rifle
Infographic
Made with Visme Presentation Maker
PART ONE
Expect the best, Prepare for the Worst: How to Develop the Right Mindset for a Bug Out
When disaster strikes, a matter of seconds can mean the difference between survival and failure. However, even the most battle-hardened veterans need to keep a cool head to ensure their survival and escape from a hairy situation. Still, there are a number of psychological habits and routines that you can develop to provide the necessary mindset to better ensure your survival in the event of a catastrophic collapse.

How to deal with stress, negativity, boredom and fear during a survival situation
When engaging with a survival situation, there are a handful of mindsets that can create more danger than the scenario already entails. Some of these pitfalls may seem natural or benign, and in other situations, they may very well be. But when life or death is on the line, even minor mindsets can mean the difference between survival.
Fear - Fear is the mind killer. When your mind becomes overtaken by fear, your fight or flight response kicks in. This can be a lifesaver if you have seconds to survive and must react on pure instinct. However, in almost every other situation, your best bet is to take a breath and center yourself.
Keep in mind, your instincts are likely not developed to handle the multitude of life or death scenarios you may encounter in a survival situation. Just because you braved the fear of war does not automatically qualify you to handle the terror of being buried alive by an avalanche.
Unless you have specifically trained for a scenario to the point that the appropriate response triggers like muscle-memory, your first step should be to take a few deep breaths and calm down. From there, your next step should be to assess the situation as quickly as possible and make it a point to focus on motivations outside of yourself- friends and family.
Stress - Stress can create a situation similar to fear where you lose the ability to think and analyze rationally. However, in this instance, instead of an immediate and present threat, a general threat begins to grate on you cyclically.
Difficulty finding a freshwater source in the event that your supplies are lost can be incredibly stressful when survival is on the line. However, allowing yourself to be overcome with stress will not do anything to ensure your survival.
Similar to fear, taking deep breaths until you calm down, and other relaxation techniques can help. Moreover, indulging in a physical activity-even something as simple as unpacking and repacking your bug out bag-can clear your mind, allowing you to look at the situation rationally once more.
Boredom - This may seem a bit odd, but idle hands are the devil’s playthings. The main issue with boredom is that it breeds complacency. A complacent person is often a more careless one, and in a survival scenario, carelessness can get you killed.
Keep a deck of cards or some other item of entertainment that is small and light. Have a list of tasks that need to be completed before your survival can be sustained and continuously add to that list as you complete previous tasks. Regardless, if you do not have anything to do, then you likely have not done enough.
How to be adaptable according to the circumstances
While it is impossible to be completely prepared for all possibilities, you can still be better prepared for some of the most dangerous or most common threats to survival. The total number of possible threats are innumerable, but the probable threats do allow for planning and acclimation. Some of the skills and adaptations you can hone are:
- Training yourself to withstand extreme cold
- Practice shooting regularly and under different circumstances
- Learn the lay of the land of your bug of location and its surrounding area
- Build shelters and fire in a variety of adverse conditions
- Train yourself to go without sleep for long stretches of time
- Increase your endurance with stamina training exercises
Dale Goodwin – Survivalist Prepper
Follow Dale: Twitter | Facebook | Google+ | Pinterest | YouTube
 The survival mindset and situational awareness are key regardless whether you are talking about bugging out, bugging in, or just getting home when a disaster strikes. The sheer will to survive, coupled with the necessary skills will get you through more situations than supplies and gear.
The Importance of the STOP acronym
When you do come upon an unfamiliar situation, there is a method that you should employ in order to best react to this kind of event. This is called the STOP method and is broken down into four simple steps: stop, think, observe, plan. Whenever you find yourself in a stressful situation that requires a quick response to ensure your survival, this is the method you should use.
S - Stop When the rubber meets the road, the untrained mind is liable to feel the need to immediately react. However, this is often not the best course of action unless your life is in immediate danger. This is because the initial reaction is based on instinct, and instinct is not truly rational. As such, the first step your mind should take in the event of a disaster to best ensure survival is to simply stop the initial natural fight or flight response.
T - Think Once you have gathered control over your thoughts, your next step is to assess your current situation. When disaster strikes where are you? What supplies do you have on hand? Where is your closest bug out location? These are some of the most important and relevant pieces of information that weigh heaviest in the first five minutes-arguably the most important minutes-immediately following a disaster.
O - Observe Once you have fully assessed your situation as it relates to your previous work and planning, the next step is to take stock of the conditions surrounding you. Remember when we told you to be prepared to adapt? This is the beginning of that process. In the previous step, your task was to take stock of your bug out plan. This step is all about taking in your present surroundings. What is the temperature? Time of day? Regional geography?
P - Plan Once you have fully assessed both your current situation and the most immediate factors, the next step is to formulate a plan. Unfortunately, you will not have the luxury of time on your side, so you will need to formulate your plan of action relatively quickly. Still, it is far more important that your plan is of sound construction than of hasty preparation. Regardless, it is advised that the entire STOP process should take no more than between five to ten minutes total.
Like our content? Share it on social media!
PART TWO
How to Create a Rock Solid Bug Out Plan
All of the supplies in the world and the best-packed bug out bag will not mean a hill of beans if you never make it to a secure location once a disaster strikes. That is why it is important to have a plan to get you and your loved ones-be they family or friends-from ground zero to your bug out location.

First Step: Consider the Kind of Disasters Most Likely to Occur
In the multitude of possible disasters you could encounter which would force you to enact your bug out plan, all can be categorized into two broad groups: natural and human. Granted, some of the possibilities may stretch those two categories or overlap, but broadly speaking, those are the general types of disasters for which your plan will have to contend.
Specific natural disasters are likely somewhat expected and are heavily dependent on your location. If you live in a cold weather climate, then blizzards and other snow or water-related disasters are relevant. Conversely, someone who lives in the desert is unlikely to have to consider those situations-aside from a possible “once a century” flash flood.
Human disasters are those that are caused by or made dangerous due to the presence and reaction of other people. A complete economic collapse or hostile invasion fall into this category. Similarly, while there is a natural element, the outbreak of a deadly disease is likely more influenced by human behavior-specifically, travel patterns and quarantine procedures-than the disease itself.
However, human disasters are far less likely to be confined to specific regions as even rural areas will see an influx of activity and potential threat in this event-though, remote locations stand a much better chance of escaping the worst of a human disaster.
Some disasters which blur the line include things like thermonuclear war. While this disaster would without question be caused by humans, your primary concern, once you are able to escape a heavily populated area will be environmental in nature-namely, escaping the radioactive fallout. Of course, as time wears on, other people will again become a threat in this event, once survivors make their way out of the hot zones.
Second Step: Define a Rally Point
Unless you are given clear indicators days or weeks in advance, disaster is liable to strike without warning. Since it is often impossible to predict when you will need to make haste to your bug out location, it is important that the people you intend to provide security to, know where to meet up once disaster strikes.
This rally point is actually one of the most important decisions for your bug out plan as it will affect how easy it is for your party to meet up and be accounted for. Without a well-defined rally point, trying to get everyone together can be a bit like herding cats. Either, one group of people goes out to look for stragglers-one of the worst things you can do in this situation-or you waste valuable time waiting for everyone else to meet up.
When selecting a rally point, there are a few characteristics that you need to consider so that the least amount of time is wasted and the chance of confusion remains minimal. These qualities are:
Accessibility - Accessibility should be analyzed two-fold: first, it is important that the rally point allows everyone to reach it simultaneously. Time is of the essence as the disaster in question will make things chaotic and inherently increase travel time. Waiting for a single party member to meet up because the rally point was not accessible can dig a hole that is difficult to get out of.
Specificity - “The city park” is not an appropriate rally point unless the park is effectively small enough to ensure that the party members all meet up at the same exact location-an unlikely reality. Instead, make sure that the rally point offers no chance for confusion. A specific house, room, etc is vital to ensure that you do not waste time looking for party members even once they have all reached the rally point’s general location.
Security - A rally point that is in and of itself treacherous does little good in protecting against a disaster. Areas that are in central urban regions should be avoided at all costs if possible. Similarly, rally points with few routes of escape should be crossed off the list. While the perfect rally point for all situations may not exist, try to set up a point that minimizes your contact with non-party members as much as possible.
Variety - Ultimately, you should have a couple rally points with clear guidelines for when which one applies. If everyone is scheduled to be on one side of town, you will want to designate a different rally point in case two groups are across town or if everyone is spread out equidistant. Different starting configurations of your party should inform different possible rally points.
Third Step: Have Multiple Destinations, Routes and Drop Points
One of the worst things you can do is hem yourself into a single plan because plans rarely go accordingly. As such, it is a good idea to develop numerous plans.
These plans should include different bug out locations, different routes to each location, and multiple supply caches along each route. Having this type of redundancy built into your bug out plan ensures that if an option is unavailable, you have many others to choose from.
Moreover, if one plan seems ideal in the beginning but sours due to emergent conditions, you are able to effectively change plans without a loss of time or a significant increase in risk. This prevents you from getting stuck following through with a plan that disintegrates on the fly.
Fourth Step: Test Out Your Routes and The Transportation You’ll Use
While you cannot necessarily predict how your route will fare during the chaos of a disaster when a general population is likely to present an impediment, you can still test it out. Do a dry run of different routes with different types of transportation.
Walking and driving are the most likely, but if you access to horses or ATVs, see how developing an off-road route compares to an on-road route. Moreover, try to test on-road routes during rush hour when traffic is liable to be more similar to the mad panic of a large population trying to flee all at once.
Todd Sepulveda – Prepper Website
Follow Todd: Podcast | Facebook | Twitter | Instagram | Pinterest
 One of the least considered modes of transportation when the SHTF is a bicycle. A good bike can get you really far down the road. A good mountain bike can go areas where other modes of transportation couldn’t. A bike is easy to carry, if necessary. Doesn’t need fuel. And the parts and tools to repair it can easily be stowed on the bike itself. Another aspect of utilizing a bike as a mode of transportation when the SHTF is that it will take the weight of your bug out bag off your back if you have a way to secure it to the bike. A bike might be a great alternative for a parent who has to bug out with children or pets.
Fifth Step: What are the Items You’ll Need
While we will go over what and how to pack your bug out bag in a later section, there are a handful of items that you will want to ensure are located at the various cache locations along your routes to your bug out location. These include:
- Water
- Compass
- Stationery
- Communication devices
Ideally, it would be nice to have a fully packed bug out bag at every cache as well, though that may take time depending on your means and the quality of chosen gear.
Sixth Step: Don’t Forget to Identify Your Strengths and Weaknesses
What skills have you already developed, and what skills yet would you ideally develop to be better prepared? These are vital considerations, but they should not be taken as static ones. The best preppers are constantly adding to their repertoire of valuable skills.
As such, you should make it a point to identify what you can proficiently accomplish. These should be classified as your strengths. Granted, you may exhibit varying degrees of skill beyond competency, but that should be a baseline.
As you a acquire new skills, update your assessment to identify other skills in which you are relatively untrained (hint: reading a book about a subject can provide valuable insight, but it is no substitution for the time you will need invest in developing skills in the field-under adverse or stressful conditions if possible).
Once you feel confident in achieving at least base proficiency in the most relevant survival skills, then you can move on to refinement. Regardless, keeping track of this progression can aid you when making your way to your bug out location.
If you are not skilled in orienteering but can recognize various natural formations and understand what they mean, maybe let someone else be the navigator while you act as the forward scout.
Seventh Step: Consider the People you’re Going to Bug Out With (children, elderly and so on)
It is quite likely that your party will contain members which may not necessarily be up to the task of survival on their own. Whether they are young or old, sick or lame, or afflicted with any sort of condition which could impede their chance of survival, these things must be considered ahead of time.
If someone cannot walk, how will you transport them in the event that you cannot travel by vehicle? Who will carry the additional weight of supplies for a party member who cannot bear their own load?
When the rubber meets the road is the worst time to figure these things out. Instead, it is better to not only plan for these conditions but practice with them ahead of time. If you have a small child, do your practice runs with additional gear to simulate what you would be carrying should disaster strike. If someone has difficulty walking, do a dry run pulling a cart laden with 150 pounds of stones.
Eighth Step: Is Not Enough to Have Your Plan in Your Head, Document it!
A proper bug out plan requires numerous steps and contingencies. Keeping track of all of this information is not something you should simply rely on your memory to do. If you have an exceptionally good memory, great.
It is still important that you keep track of the details of your bug out plan. Maybe members of your party do not have as good of a memory as you. Maybe you focus on certain details or routes more than others based on the likelihood of necessity or use.
However, if that day comes where the least likely solution is the one that will keep you alive, having a hard copy of your plan will not only save you the stress of having to recall that information in the heat of the moment, but save your life.
Further Reading:
- How to Plan a Bug Out Route for Emergency Evacuation | Graywolf Survival
- How To Make A Family Bug-Out Plan | Survival at Home
- Survival Skills: Make A Bug Out Plan | Outdoor Life
- BOB - (What is a Bug-Out-Bag?) | Survivor Jane
PART THREE
How to Choose a Good Bug Out Location
With all of this talk about how you plan to meet up and travel to your bug out location, just as important of a question you should ask is “where should we go?” The best plan in the world is meaningless if your bug location is not safe and secure.
Of course, numerous factors will weigh in on what the “right” bug out location is for you. Keep in mind, people in different areas will not have the same “best” bug out location. Someone living in an urban area under a fault line should have a vastly different bug out location than someone living in a rural region under a super volcano (LA vs Yellowstone).

Tip #1: The Distance of Your BOL
While it may seem easy to simply believe that the further away you are from danger, the better, this may not actually be the case. Granted, your bug out location needs to be safely away from immediate threats, but beyond that, what benefit do you get?
While there can be definitive benefits for this setup, one drawback is that the ability to potentially scavenge or resupply is made all the more difficult for every additional mile between you and wherever you escaped from.
Moreover, every mile from your starting location to your bug out location is another mile you have to travel. If your route is fortunate to allow vehicular travel, all the better. But if it is not, those additional miles will drain you and your party of precious energy and supplies.
Tip #2: How Easy or Hard it is to Get There.
Much like location, this factor is a double-edged sword. If it is difficult for you to get to your bug location, then that means it would be even more difficult for someone else who has not planned nor prepared to get there. This offers an additional layer of security from people-which can be a greater danger during a disaster than the disaster itself.
However, if your bug location is difficult to reach, then every condition of the journey that does not go according to your ideal plan simply makes your journey that much more difficult. If you can, try to strike a balance so that your bug out location is not too difficult to reach by foot if you know where you are going and how to get there, but is still challenging to people without that information.
Tip #3: Take into Account How Long You Plan to Stay There.
Many survivalists ideal situation is to have a bug out location that allows you to survive indefinitely if the need should arise. While this is definitely a reasonable goal, it should not be seen as the only one.
The odds of you needing to stay at a bug out location indefinitely are fairly slim. It is far more likely that you will only need to stay at a bug out location for a couple weeks to a couple months.
Regardless, the amount of time you expect to stay in that one spot will determine and inform a number of your decisions when choosing the location. Most places can be turned into a temporary shelter, but few can sustain for years.
Still, if you are adamant about a bug out location that could functionally serve as your new home should the need arise, there are a number of considerations-both in regards to the general region and the property itself-that must be taken into account.
Tip #4: Don’t Forget to Choose a Location with a Source of Water Nearby.
More than food, more than shelter, water is the most vital resource necessary for survival. You can technically find ways of living exposed for months. You can go without food for a couple weeks. However, go without water for a few days and you run a serious risk of death.
Whether you intend to use your bug out location for short-term or long-term shelter, you should only select a spot that has a source of fresh water nearby. Even if you stock your location with a surplus of potable water, unforeseen problems can occur, and a lack of water provides little time to find the solution.
A river or stream is preferable to a pond or lake, because the moving water helps prevent the buildup of bacteria and parasites that stagnant water can attract, but almost any clean, fresh water is preferable to none. However, fresh water is not the only natural feature to look for in a great bug out location.
Tip #5: If Possible Consider a Naturally Protected or Hard to Find Place
When choosing a bug out location, fresh water is definitely king, but other features can provide different advantages. For instance, you will likely want to be left alone while you wait for the disaster that forced the escape in the first place to subside.
Maybe you were able to supply your bug out location with enough food and water to pick up a few stragglers, maybe you were not. However, it is fairly unlikely that the plan itself included one or more random people finding your bug out location and expecting aid.
In this case, natural features which can make your location more difficult to find and offers an alternative to the “wait and pray” method. Large rocky outcroppings or thick brush can provide cover to keep you spot hidden and prevent multiple points of approach from outsiders.
Tip #6: Don’t Forget to Consider the People who Live Nearby.
Another factor to consider is your neighbors. How close is the next person to your location? Again, like with many factors when choosing your bug out location, this can be a give and take factor.
On one hand, being isolated from other people will help ensure the security and concealment of your location. The fewer people who know where you are, the fewer other people who can find out where you are. As they say, loose lips sink ships.
However, what if something goes wrong and, for whatever reason, you need immediate outside assistance? In this instance, having a neighbor nearby would be a godsend.
We recommend taking a measured approach with this consideration. A neighbor that lives within a couple miles is likely not to know the intimate details about your property. Conversely, should you require their assistance, they are within walking distance for all but the direst of circumstances.
Tip #7: Does it Have a Good Shelter in Place?
Having already covered water, shelter will be the next necessity on the list you need to ensure. While it is possible to endure exposure to the elements longer than a lack of food, that fact only holds true if the elements themselves are fairly temperate.
Throw yourself into sub-zero weather or blistering heat, and the climate can kill you much quicker than a lack of food. That is why it is important to have a shelter that can both provide shade while allowing airflow for unseasonably warm days while locking tight and keeping you insulated during freezing nights.
Tip #8: If You are Preparing for a Long Term Disaster Consider the Off-grid and Homesteading Opportunities of your BOL
This factor is generally more relevant if you are designing a bug out location to support you for more than a couple months. If you have the luxury to secure a bug out location, you are likely able to provide a couple months of rations.
If those rations should exhaust before the disaster ends, however, you will need to do something about long-term sustainability. This is where homesteading comes into play.
Growing a garden ahead of time to supplement your diet will not only stretch your supplies further but provide additional vitamins to keep you healthy and strong.
Moreover, while solar power may provide some nifty amenities, it can be a lifesaver for storing medicines and other supplies that need to be kept cold. Likewise, any captured game can be stored much longer in a solar-powered freezer than not-unless you know how to salt and cure your own meat that is.
Tip #9: Don’t Forget to Stock up your Bug Out location According to the Number of People You’ll be Helping
Whatever plans you make, it is important to ensure that you have enough supplies for your intended party to last at least a couple months without further assistance. More often than not, your bug out location will not be necessary beyond a few days to a few weeks of use in the event of a natural or human disaster.
Still, because preparedness does not plan for the likely or best case scenario, it is advised that a minimum of three months supplies remain stocked at all times. Moreover, while you may be able to get by with rationing, it is far safer to supply your location with the same amount of supplies portioned per person. Also, keep a running list of expiration dates for your supplies to prevent the stockpiling of supplies which would go bad should you be cut off from future stocks.
Further Reading:
- (BOOK) Prepper’s Survival Retreats: Your Strategic Relocation Plan for an Uncertain Future
- Picking A Bug Out Location | Tin Hat Ranch
- Bug Out Location: 7 Essential Qualities For Your Secret Setup | Skilled Survival
- Tips for Picking a Bug Out Location | Survivalist Prepper
- Considerations for SHTF Living & Bug Out Locations | SHTF Plan
PART FOUR
Customizing your BOB: Things to Consider
While there are numerous tools and supplies that will be useful regardless your situation, every person’s bug out bag will be slightly different than someone else’s. Whether it is because you have particular needs, live in a specific biome, or are prepared to only bug out for a limited amount of time, your bug out bag should be tailored to the most likely encountered scenarios.

Take into Account the Location, Climate, Geography, and Population
One of the primary considerations when building your bug out bag must be your location. This will not only inform some general factors for the most relevant gear, but it will also weigh heavily when determining what type of emergencies you are likely to face-one of the other factors in this article.
In terms of location, there are three primary concerns with which you will have to contend: climate, geography, and location. Each of these three generally informs the others such that there will appear certain trends. For example, various types of climate often correspond to certain geographies. Furthermore, different geographies often place rough limitations on the supporting or viability of populations-barring historical precedent or strategic purpose.
Still, it is important to remember that every choice carries with it a consequence. For each piece of gear you pack, that is space and weight that could be occupied by something else. As such, all of your gear should either play numerous roles or vitally important ones-or ideally both.
Climate - This factor can roughly be broken into two primary considerations: temperature and precipitation. Winds can also be a factor, but it is often more of a compounding influence than anything else. Most of the gear that guards against temperature or precipitation will also function to protect against the wind.
For those who live in wet regions, your backpack should be waterproof or, at the least, water-resistant. Moreover, any gear that can be damaged or destroyed by excessive wetness needs to be kept in waterproof Ziploc bags. Any electronic or mechanical gear will also ideally be waterproof or water-resistant.
Cold and hot regions will similarly need preparation.For the cold, it is obviously important to pack some type of thermal insulation, whether worn or covering. For heat, additional water is fairly obvious, but even some foods can assist in this as well. Pickles, for instance, naturally lower the internal body temperature.
Geography - Depending on your environment, different types of gear will be indicated. If you live near a swampy or marshy area, your shoes should be waterproof or water-resistant, and you will want to pack extra pairs of socks. Mountainous or hilly terrain will want some moderate climbing gear-not necessarily the full regalia, but some pitons and maybe even boot cleats. The point is, your geography should inform the type of some of your gear as well as unique items.
Populations - If you live in a rural area, your preparation for people will differ than if you live in the suburbs or in an urban region. For more populated areas, you will want to keep a pair of work gloves and a dust mask for potential air contaminants and demolished structures. Moreover, a small amount of cash to engage in trade-depending on the disaster-may also come in handy. Just remember to also keep a firearm for self-defense.
John Paul Tedesco – Econo Challenge
Follow John: Facebook | Google+ | Instagram 
Knowledge is the most important part of your survival kit or bug out bag. It is easy to carry, does not take up space in your bag, and is available to you exactly when you need it. When you consider the many items you need to include in your bug out bag ask yourself, do I have the knowledge and experience needed to use each and every item in my kit? If not then learn or leave those items behind.
It certainly is a terrible idea to try and learn how to use items in your kit at the moment they are needed. For example, a well-stocked first aid kit is certainly an essential item. Do you know how to close a wound using a needle and thread? Maybe someone told you super glue works well for this purpose.
Have you ever tried to close a wound using super glue? You may end up like a friend of mine, pulling chunks of hardened super glue out of your skin as it heals. If you have not acquired the knowledge and experience using all the items in your bug out bag, you might have a false sense of security carrying useless dead weight.
Don’t Forget the Duration of the Disaster
While it would be nice if you only had to bug out for a couple days to a few weeks, it is far better to be prepared to survive for months without returning to or scavenging from populated areas. As such, you will need a way to provide the bare minimum necessities of life.
If you already have a well-supplied bug out shelter, the need for long-term survival gear does not diminish. What happens if your shelter is destroyed by the disaster or if you are, for any reason, unable to reach it? In this instance the ability to purify water and hunt or gather food is vital.
There are numerous options for water filtration-both purchased and makeshift. Similarly, game should not be ignored-though it is better to hunt with a bow than a gun since the arrows are more likely to be used multiple times.
A rudimentary fishing setup-line, hook, and bobber-as well as something to make snares should all be included. A small book of the local flora will provide an excellent resource for gathering edible plants to supplement whatever you can catch.
Type of emergency: Evaluate What is the Kind of Event Most Likely to Occur in Your Location.
This factor will mostly be informed by the location qualities we already covered. If you live in a temperate, urban region, a human disaster is far more likely to occur than a mudslide. However, the possibility for sudden inclement weather or an earthquake-if you live under or near a fault line-remain potential disasters that you should prepare for if indicated.
Climate will span population concerns, but not location. Someone living in Milwaukee will need to be prepared for a blizzard as much as someone who lives in Janesville, Wisconsin. Thankfully, most climate-based disasters outside of tornadoes provide plenty of warning.
PART FIVE
Picking the Right Backpack: Tips to Keep in Mind
Just as important as the gear that you choose to bring is the pack that will be carrying all of that gear. The right backpack can ensure that you have everything you need, while the wrong backpack can leave you struggling to find room or make tough cuts for vital pieces of equipment. However, it is important to remember that the best backpack is not the same for all survivalists and still carries an inherent benefit to consequence ratio.

Tip #1: Pick a Backpack with Enough Space
This factor may seem a bit obvious, but it is important to remember that the larger the pack and the more gear you carry, the heavier the load. If your location requires you to hike for more than ten miles over treacherous terrain-especially if the most dangerous part of the path lies at the end of your destination-then an overladen pack, while useful, may present its own kind of existential risk.
Enough space should be understood as “just enough, and no more.” If your pack offers an abundance of room, you will surely be tempted to fill it with more gear than is “necessary” for one rationalized reason or another but truly just adds more weight to the load.
Tip #2: Don’t Forget to Choose a Pack that is Lightweight
Speaking of weight, the gear that you are carrying is likely to exceed thirty pounds and maybe more than fifty. In this regard, it makes little sense to use an all leather backpack. Sure, a fine grain leather backpack will be both stylish and durable, but that leather is liable to add anywhere from two to five more pounds to your load, depending on the pack’s size.
Instead, a durable polyester is a better material for your backpack to be made out of. Polyester is far lighter than leather and more durable than nylon. Keep in mind, there are varying degrees of polyester quality so be careful that you do not skimp on the cost or you are liable to end up with a poor quality pack.
Tip #3: Choose the Highest Quality Pack You Can Get
Speaking of quality builds, there is another reason to choose polyester over most other materials. Aside from being lightweight, polyester is also naturally chemical, puncture, and water resistant. Moreover, it is relatively easy to find a polyester that has been treated to make it fully waterproof.
In terms of general durability, you will want to purchase a pack that is rated at least 600D. Keep in mind, the weave rating of polyester can go well above 1000D, but those will generally cost more as well. You should also look for a pack that has reinforced seams and maybe even rivets.
Tip #4: Make Sure Your Pack is Comfortable
Considering you will likely be walking for miles, it is important that the load you carry does not cause undue strain on your body in general and back in particular. An injury which inhibits your ability to move freely can be more dangerous during a disaster than the disaster itself. As such, you will want to make sure that the pack is comfortable and distributes the weight carried evenly and high on your back.
You can alleviate some of this by how you arrange your gear in your pack. However, the majority of the comfort will be determined by your pack’s straps. For maximal comfort, the straps should be wide with thick padding to prevent digging into your shoulder. Moreover, the straps should be designed so that the leverage of the weight sits higher up your back rather than lower.
Tip #5: Get a Pack with a Good Amount of Compartments
With the multitude of gear that you will be carrying, some items will inevitably be useful in more situations than others. For instance, unless you are in a frigid environment, your blanket will likely only be necessary once you have stopped traveling for the day. This allows you to pack it in the main compartment and not near the top.
However, other pieces of gear, like lighting, fire starters, certain water filters, and the like, are not only used more often but are smaller as well. Because of this, you do not want to place these items in the main compartment where they may shift to the bottom and become difficult to retrieve.
This is why you will want to ensure that your pack has numerous compartments and pockets of varying size. Moreover, spots to clip carabiners and lanyards are also important. Any feature that allows the easy storage and retrieval of often used gear should be given a moderate priority.
Tip#6: Last but Not Least, Choose a Pack with a Color that Doesn’t Catch Attention.
Finally, your pack should be inauspicious. Normally, the opposite is true. More often than not, it is advised that packs are brightly colored or fashioned with reflective strips. This serves to alert hunters to your presence or make it easier to locate you if you become lost.
However, during a disaster, people can be as much of a threat as the natural environment. Keep in mind, over fifty percent of the population is not prepared for a disaster, so seeing someone who is may present too much of a temptation to pass up-whether malicious or sympathetic. As such, it is better to not be seen, and a pack that blends into the surrounding environment should be preferred.
Like our content? Share it on social media!
Further Reading:
- How to Find the Right Bug Out Bag | The Prepper Journal
- 8 Preppers Share How Their Pack Their Bug Out Bags | Mighty Goods
PART SIX
How to Pack for Maximum Space, Efficiency and Practicality
Once you have a list of your gear and have selected your pack, the next step is to actually figure out how the gear should be arranged. This is a vitally important step and will determine both how easy it is to carry and retrieve your gear from your pack.
This step should not only be determined well in advance, but you should also pack and repack the gear numerous times in a variety of ways to find out what works best for you. Finally, you should document the final packing order to both make packing it in a hurry easier-should it not already be pre-packed-as well as knowing where everything is in a few seconds.

Pack your Fragile Items in Containers and in Terms of Their Function
Pack the items according to your most important needs in small containers or plastic bags (water purification, fire starting and so on) or in terms of their function.
While every piece of gear you carry should have a clearly defined use, some of them will inherently be more vital for survival than others. Sure, a deck of playing cards or a book can help pass the time and prevent boredom from making you careless, but if they get wet and become ruined, your immediate survival is not at risk.
On the other hand, there are pieces of gear that, if they become ruined for any reason or by any cause, will definitely make survival more difficult and may even present an existential threat. In this case, you should identify these pieces of gear and take extra measures to ensure their structural integrity. Any gear that can be ruined by pressure or falls should be kept in shatter/break proof containers.
Anything that is made of paper or similarly fragile materials needs to be kept in a watertight container. Anything from important documents to a map to a regional guide fit this bill. Similarly, anything which is electronic should also be kept in a watertight container. Many communication devices might be water resistant, but there is no reason to test its limits if you do not have to.
Keep the Items You Need the Most in the Outside Pockets of Your Bag for Easy Retrieval
There are certain pieces of equipment you are liable to use constantly. For instance, if your bug out location requires a ten-mile hike to reach, chances are you will need to bring a topographical map of the region.
Unless you have hiked the area extensively, you will likely need to refer to the map somewhat frequently-this is even more relevant if the region is flat and heavily wooded. As such, you will want to place the map in a part of the pack that is easy to stow and retrieve at a moment’s notice.
This is where the compartments will come into play. Various critical items that are smaller like matches, communication devices, and certain first aid materials should also find a home in compartments. Keep in mind, the pieces of gear stowed in compartments are quite often the same pieces of gear that will require additional containers to ensure their safety.
Of course, it should go without saying that your water should remain in a pocket or sleeve at all times. It is also a good idea to place a midday snack in a pocket, so you do not have to actually stop moving to retrieve it.
Pack Smart by Distributing the Weight of Your Items for Easy Carrying
Pack the heavy items close to your back to distribute the weight in a way that is easier to carry. (heavy items that you won’t use too frequently at the bottom and lighter more frequently used items at the top)
The order in which your gear is packed should follow two primary factors: weight and use. The items which are heaviest should be located closer to your back, while the items that are most useful should be located near to top. That being said, your pack’s arrangement should be broken down into three separate sections.
Damian Brindle – Rethink Survival
Follow Damian: Facebook | Twitter | Pinterest 
To be honest, it’s not hard to develop a plan you can follow. Get out a piece of paper and start writing. Jot down what’s critical to you for your survival, note where each item is (by room), and if you like, include some numbering system to show how important each item is.
So, for instance, I might suggest that my bug out bags are top priority whereas my firesafe is slightly less important and my wife’s numerous photo albums at the bottom of the list. I would then list these items, note where they are, and then sort them from most important to least important (e.g., 1 to 5 with 1 being most important) or whatever system works for you. You’ll have a good-sized list fairly quickly.
I use Excel for this purpose but pen and paper work just fine too. Now, you need to decide what’s really important. That’s why I like segregating my lists into 15 minutes, 1 hour, and 1 day lists so that if I have more time I can pack more stuff, otherwise, I just grab the MOST important stuff. That’s the stuff that makes my 15-minute list.
Slightly less important stuff makes the 1-hour list, and nice to have stuff makes the 1-day list. See? So long as you’re ready to bug out in 15 minutes, in that you’ve got the gear and plan to make it happen, then you’re really ready to bug out given any time-frame presented… then it’s just a matter of “playing Tetris” in your vehicles to fit more stuff.
My advice: do your best to be ready to bug out within 15 minutes. Get your essentials down to the bare minimums–whatever that means to you–and then expand on your plans to include more stuff, more vehicles, etc. Use a simple sorted list to decide what’s most important and there you have it. Of course, I have my own ideas on how to do this and include a complete template in my Prepared PATH course but you can certainly make your own too. The point is to follow Nike’s slogan and “Just do it!”
Reference Article: If You Only Had 15 Minutes to “Bug Out,” Could You? My Thoughts on Doing it Right…
The Top of Your Backpack
In order to maintain the structural integrity of your gear, you will want to pack your bug out bag according to weight descending. Basically, the heaviest gear goes on the bottom with the lightest gear on top.
This is actually somewhat unfortunate because it ultimately places additional strain and a further imbalanced lever against you. Still, it is unavoidable unless you want to gamble that your gear will remain structurally sound bouncing with thirty to forty pounds of gear on top of it.
Regardless, the top should also be reserved for items that you will need regularly or in a hurry. For instance, if your first aid kit will not fit in a pocket, it needs to be placed at the top of your pack. While you may not use it all the time, you want ready access to it when you do need to use it. Other items that fit this bill are snacks, paracord, extra flashlights, fire-starting materials and other similar items that are either often used or do not offer the luxury of digging or unpacking to retrieve.
The Core of Your Backpack
This section of the pack, the middle, will hold your moderately heavy items. This often includes the more substantial food, any cookware, and tools-like hatchets and such. These are items that you are likely to need a few times a day, but you will generally only take them out during an extended rest or for some other purpose that will take significant time.
For instance, a snack will often consist of a protein bar or some other food that can be quickly consumed. However, an appropriate breakfast will require more sustenance to properly fuel you for the day. As such, you will be preparing more substantial food. Keep in mind, you will only do this twice a day-once in the morning and once in the evening-hence why the gear will not be on top, but it will not be on the bottom either.
The Bottom of Your Backpack
This is where you place the heaviest gear that will likely only be taken out once you have set up camp. Your tent or tarp and your sleeping roll fit this description. Any additional blanket or sleeping pad can also go in the bottom of your pack. Of course, there are ways to fasten some of these items to the base of your pack outside the main compartment to free up room for other gear inside.
Other items that might be best suited for the bottom of your pack are things brought to deal with specific issues. Keep in mind, if you have forewarning that this gear might be necessary in the near future, you should migrate it further up the packing order. However, if you have a day or more’s travel to a mountain, there’s no need to keep your climbing gear on top at the ready.
Make a List of All Your Items and Evaluate What are Totally Necessary To Have
Don’t pack too many items, make a list and evaluate what are the items that are essential to have and get rid of the rest.
A bug out bag is best packed when taking a minimalist approach. If a piece of gear does not serve a vital function, it simply adds more weight for you to carry and occupies space that could otherwise carry something more important.
Items that can competently serve multiple functions are preferred over more specialized gear. That is why a high-quality Swiss Army Knife is a part of any reputable bug out bag. Keep in mind, a Swiss Army Knife is really just a multi-tool, but the compact design and versatility is the important point.
The entirety of your pack should be a weight you could comfortably carry for multiple days-maybe even a week or more-worth of hiking. If your pack is so heavy that you have to take multiple breaks and are sore the next morning, you should try to find ways to lighten the load.
Ideally, you will have figured out what the best carrying weight for you is well before your bug out bag becomes a survival necessity. A good rule of thumb is that people with average builds should not carry more than one-third of their body weight while slight builds should not carry more than one-fourth of their body weight.
There are always exceptions to the rule, and exceptionally strong individuals may find no difficulty in carrying up to half their body weight. However, the more weight you carry, the more shift in your balance. This is especially relevant for taller people with higher centers of gravity who will be imbalanced more by additional weight than individuals with a low center of gravity.
Further Reading:
- How to Pack your Bug Out Bag | The Prepper Journal
- 14 Brilliant Bug Out Bag Packing Tips | Graywolf Survival
- How to Organize a Bug Out Bag | Modern Survival Online
PART SEVEN
What to Consider to Keep you Hydrated When Bugging Out
Easily your most valuable resource on the bug out trail is water. If you are fortunate, you will live in a region with a clean supply of running fresh water. A river or stream can take a load off of your shoulders-literally.
If you do not live near a clean source of fresh water, then the rationing of water becomes a decision of literal life and death. That is why when you are developing a bug out plan, the availability and amount of water you have access to is a top-tier priority.

How Much Water Do You Need to Reach Your Destination?
There are three common uses for water when bugging out that will apply to all scenarios: drinking, cooking, hygiene. Of the three, only drinking is necessary for survival. While water for cooking can be convenient and water for hygiene desired, it is only potable water that is necessary for survival.
In fact, absent water, sand or other dry, coarse sediment can be used to clean most of your body. The sediment will adhere to sweat and other fluids and exfoliate as it is rubbed away. Unfortunately, there is no alternative substitute for cooking, but there also does not need to be.
Keep in mind, it is perfectly safe to eat dehydrated food without hydrating it first. Granted, it may not be quite as tasty and will take longer to reach satiation, but there are no side effects other than potential bloating if you eat too much too quickly.
Regardless, unless you have an abundance of readily available fresh water at your disposal, it is not advised to use any of the water you pack for purposes beyond drinking. In fact, other than cleaning a wound-which is better done with hydrogen peroxide or isopropyl alcohol-fresh water can serve no better purpose than drinking when bugging out.
Remember to Have at Least 3 Days of Water
Of the different uses of water covered, drinking is by far the most important. While hygiene is important in the long term, you can go months without showering or brushing your teeth. Granted, that is not an ideal situation and could cause short-term health issues, but it pales in comparison to the consequences of not having water to drink.
Your bug out bag should include enough water for a minimum of three day’s use. Keep in mind, those three days do not include using water for all the aforementioned purposes. Of course, if you live in a region without access to clean freshwater, you will likely want to save your water supplies for drinking exclusively.
Once you have already started bugging out, finding a source of fresh water should be your top priority if you do not already have one on your route. Yes, there are some techniques that allow you to draw water through condensation, but they are rarely usable while hiking.
Regardless, once you do locate more water, refill your stock and try to find immediate uses for the rest. Remember, you are not going to be able to carry more than you planned in the first place without supplanting other gear-though this may be a preferred improvisation depending on your situation.
Have at Least Two Ways to Purify Water
Once you locate fresh water, the next step is purification. Untreated fresh water can be a host to a number of bacteria and protozoans that can make you ill or even cause death. The most common symptom would be diarrhea, which causes dehydration and creates a deadly cycle.
Filtration or chemical treatment are the two most common types of water purifiers, though simply boiling the water can work in a pinch. Between the two, filtration is generally the better option since chemical purification requires finite resources.
For filtration, there are improvised options like fabric, but that does not provide a truly purified result. Instead, a better option is to carry a designed water filtration device. There are mechanical, suction based, and gravity filters. Ideally, you will carry more than one.
Mechanical is the least preferable as any failure of the mechanism makes it little more than dead weight. Gravity filters are often the most convenient, but you run the risk of their plastic pouches ripping. Suction filters are basically straws that filter the water you drink. This can be effective, but you will have more difficulty carrying larger amounts of water with you without contaminating the receptacle that carries it.
Ideally, you will want to have a gravity and a suction filter with you. The gravity filter allows you to purify larger amounts of water at once, so you can take it on the go. The suction filter serves as a backup in case something happens to the gravity filter or the water you find is not enough to fill a pouch. In case you need a household water filter for your homestead or bug out location? There are some great options out there! Berkey makes a solid line of household water filters that eliminate a multitude of impurities.
Check out this infographic for a great visualization and more info.
Item List:
- Canteen
- Drinking Water
- Water Purification Tablets
- Portable Water Filter
- Hydration Bladder
- Collapsible Water Bottle
- Hard Water Bottle
PART EIGHT
Food for you BOB: What to Pack and Things to Consider
After water, food is the final element of sustenance that is necessary for survival. However, food offers a wealth of options in terms of personal taste and packaged form.
Food, cannot only have different weights for the same volume depending on the manner of preparation, its weight will vary greatly depending on the different types of food you pack. This is made all the more difficult by virtue that, unlike water, you need different types of food with different nutrients to survive.

How Much Food Should You Carry? Take Into Account Your Caloric Needs.
Identifying exactly how much food you should pack can be exceedingly tricky. Food is heavy, but it is also bulky. Whereas the liquid form of water allows it to conform and remain fairly dense, food often takes the alternate route with a relatively small amount occupying a much larger amount of space.
Keep in mind, the packaging of the food will often be just as important a consideration as the food itself. For example, canned food is often seen as the pinnacle of preparedness for a novice prepper. It is found ubiquitously in television and movies as a staple of survivalists.
However, in real-world prepping, the weight of the can itself can make it a bad choice-not to mention the questionable nutritional value for its mass. This does not mean that you should avoid canned food altogether. A used can will serve well for numerous other purposes once you have eaten the food inside.
Still, when selecting food, the primary consideration should be caloric value. Ultimately, your body runs on a calorie range, so your foods should be chosen to meet those needs. There are numerous calorie calculators available, but they will only provide a rough estimate.
Keep in mind, “active” for a normal setting includes someone who works out regularly but still engages in a fairly sedentary lifestyle otherwise. Someone hiking to their secure bug out shelter is far more active than what most of these calculators take into consideration. As such, you will need to add twenty to forty percent more calories to the value, depending on your metabolism.
What are The Factors that Make a Good BOB Food Option
Once you have a rough idea of your caloric needs, your next step is to figure out which foods are actually the most effective when bugging out. A hiker might swear by nuts and dried fruits which, while high in protein and offering a bit of a sugar boost, are actually a poor food for long-term survival.
Aside from the fact that trail mix is not dense and occupies a larger volume than would be preferred, it also is not exceptionally rich in calories-though you could do a lot worse. As such, there are a handful of factors to consider when choosing foods to take when the SHTF.
Weight/Volume
Like every piece of gear in your bug out bag, weight is a vital factor. However, when it comes to food, because there is so much variety when compared to many other types of equipment, volume will become a relevant factor as well.
Ideally, you will want food that weighs as little as possible while still providing the maximum benefits-namely calories and macro-nutrition. However, you will also need to factor in the food’s packaging.
A food that is calorie rich but packed in an inefficient container made out of heavier materials may do more harm than good. Thankfully, for most food that comes in less than ideal packaging, you can always transfer the food to packaging that better suits your needs.
Dan Carpenter – Homestead Launch
Follow Dan: Twitter | Facebook
When it comes to food for your bug out bag, it’s hard to beat freeze-dried pouch meals for “the backbone.” While I don’t recommend them for long-term food storage, they offer a lot of upside for a short-term, and potentially mobile situation. They are extremely lightweight, can be cooked in the pouch, and offer a great source of calories (plus they come in lots of tasty varieties!). Simply boil some water, pour, and wait.
Many pouch meals can be split between 2 adults, and still provide a solid energy boost. One word of caution–the sodium content of many pouch meals can be extremely high. Make sure you remain hydrated, and be smart about managing your water supply.
Calorie Density/Nutritional Value
This consideration is the second component of weight. For instance, rice cakes are exceptionally lightweight, but they also contain few calories or other nutrients. The same thing applies to potato chips. These are trap foods that fool you into thinking their lightweight makes up for the absence of calories.
However, calories are not the only component of nutrition that must be considered when choosing food. For example, your body repairs its muscles and connective tissues with protein. Since bugging out places a heavy strain on the soft, connective tissues, protein will be every bit as important as calories.
Unfortunately, protein is not a great source of calories. Instead, dense foods with a high-fat concentration provide double the calories for each ounce of weight. This will require you to balance the foods you select between caloric value and protein.
Preparation
This factor is often more about convenience. Technically, freeze dried food does not need to be rehydrated to be eaten and provide nutritional value. Of course, it can be exceedingly difficult to actually eat freeze dried food any other way.
Still, foods that have a necessary preparation requirement are those which need to be cooked to kill any bacteria or other living contaminants. Ideally, you will simply select foods which do not carry too much risk of this-foods that are low in water content work well since all living things, even bacteria, require water to survive.
Price
This is more a matter of personal limitation. Some preppers will not need to weigh the price of their food stuff as much. However, every dollar spent on food is another dollar that could be spent on other gear.
This is not an advocacy of spending as little as possible or buying the cheapest food you can. Instead, it is best to identify which foods will provide the most nutritional value in the smallest volume for the longest period of time.
Keep in Mind to Choose Foods With a Long Expiration Date.
All food has an expiration date beyond which point it goes bad. As such, it is best to select foods with a long expiration date. This decision actually works along multiple levels.
First, chances are that you plan and construct your bug out bag well in advance of actually needing it. This means that the food in your bug out bag is likely to sit for a while. While it sits there, waiting patiently, your food is slowly expiring, which will eventually require you to replace it if you do not end up needing to bug out any time soon.
The second reason is a bit more obvious, food with the perfect caloric and macro-nutritional needs will not serve you well while bugging out if it goes bad. Aside from whatever subjective discomfort eating expired food may cause, intestinal distress-especially diarrhea-will again cause a vicious cycle where the food consumed inadvertently causes you to require the consumption of more resources just to keep nutritional parity.
Further Reading:
- Best Bug Out Bag Survival Foods: The Ultimate Guide To Picking The Perfect Food For Your BOB | Be Survival
- 50+ Bug Out Bag Food Ideas | Primal Survivor
- Choosing The Best Survival Food For Your Bug Out Bag | SHTF Blog
Item List
- P-38 Can Opener
- Energy Bars
- Small Collapsible Bowl
- Daily Multivitamin Supplement
- Stove Fuel
- Snare Wires
- Metal Cooking Pot
- Yo-Yo Fishing Reels
- Metal Cup
- Portable Stove
- Pot Scrubber
- Freeze Dried Meals
- Dehydrated Meals
- Fishing Pole
- Survival Slingshot
- Spork
- Braided Fishing Line
- Military Meals
- Hook, Swivel, Sinker Set
PART NINE
Simple but effective: Shelters You Can Build to Keep You Protected
Shelter is the final feature that is generally considered necessary for survival. However, your environment may allow you to get by with minimal shelter-on occasion. For instance, if you are bugging out in a fairly dry, temperate region, you may be able to enjoy sleeping under the stars in just a sleeping bag.
However, the longer you remain outdoors, the more likely you are to encounter weather that dictates a legitimate shelter. Hopefully, your bug out location is already prepared with a stable shelter and will not require the use of something more temporary.

The Key Elements You Should Consider for Your Bug Out Shelter
The main thing a shelter must do is protect you from inclement weather. Generally, this is rain or snow, though extreme heat or wind can also be included.
Ideally, your shelter will also provide a floor to protect you from running water. However, this can be more difficult without a tent. Your shelter should be constructed on flat ground if possible. This will not only provide stability to the shelter itself, but it will also prevent you from rolling in your sleep. A shelter does no good if you roll down an incline and out into the open.
Your shelter should also be positioned so that you are not immediately visible to other people or animals. Moreover, you should ensure that your shelter is not built on diseased flora as this can cause health issues.
Five Easy to Build Shelters to Learn
A-Frame - This is one of the easiest tarp shelters to make as it only requires a single guyline and four stakes. You simply tie the guyline between two trees, drape the tarp over the line, and stake the corners down.
This shelter can provide adequate shelter from the rain and accommodate two people. However, it does not offer a floor, and strong winds from multiple directions are uncontained.
Lean-To - The lean-to is arguably simpler than the A-frame, though this shelter can actually be easily fashioned into a slightly more complex form. At its base, the lean-to only requires a single guyline and two stakes.
First, you will tie the guyline to two opposing trees, being careful to thread the line through two of the tarp’s corners. Then you will stake down the other two corners. This shelter offers plenty of room to protect against the shade. However, it only offers limited protection from the wind and rain and provides no floor.
Tube Tent - The tube tent it really a modified A-frame. However, when constructing the tube tent, you will fold one end of the tarp under the guy line, making a triangle shape.
This shelter also only requires two stakes, with one holding down two corners each. This shelter is excellent for protecting against wind and rain and even offers a floor for heavy weather. The only downside to the tube tent is that it is small and rarely accommodates more than one person.
Dining Fly - The dining fly is one of the most basic shelters and is not suitable for any kind of heavy weather. Despite the fact that it can protect against light rain, the high positioning and lack of floor even makes this a bit suspect. Moreover, it offers no protection against the wind.
However, this shelter is designed more for use to protect against light rain and the sun. Moreover, it is incredibly spacious compared to the other designs. It does require more equipment though. First, you will set up two poles at opposite ends of a midpoint. Then you run a guyline to each corner and running perpendicular from the poles and stake them down.
Holden Tent - The holden tent is fairly simple in that it requires only a single pole and guy line, though it also requires four stakes. This design is similar to the dining fly except where the second pole would go, you stake the tarp down.
This shelter provides solid protection from the rain and sun and decent protection from the wind. It does not provide a floor, but it is fairly spacious for multiple people.
Jason Marsteiner – Colorado Mountain Man Survival
Follow Jason: YouTube | Facebook | Instagram | Twitter | Google+ 
Bug out shelters seem like a simple enough concept to people but in reality, shelters can be a cumbersome task to deal with. Nevertheless, shelters are extremely important. If you know the Rule of Threes of survival, you should know that shelters fall as the second most important item in that list as a person can perish in an average of Three hours exposed when exposed to the elements.
This is of course, a general rule as extreme temperatures can accelerate the need for a good shelter, while moderate temperatures will greatly reduce the need if shelter is even needed at all. Before I get started, let me tell you a quick bit about myself. I am the owner of Colorado Mountain Man Survival and teach primitive and modern survival in the mountains of Colorado.
My team teaches wilderness survival, wilderness medicine, tactical survival…pretty much anything related to survival. I am also an instructor of Sigma 3, one of the world’s largest survival schools and a member of Flint and Steel, a group of vetted survival instructors that span the globe, with most being in the U.S. If you want to read more about me and the Colorado survival school, visit www.TheSurvivalUniversity.com.
Enough about me though, let’s get back on topic. I am going to mention bugging out, bug out bags, survival kits and the like in what I write below but by no means should any of this apply to just bugging out.
This also includes get home bags and your standard hiking backpacks. Even if you are out for a nice leisurely stroll in the backcountry, you should always be thinking of shelter in case something goes wrong. I don’t teach TEOTWAWKI Survival, I teach practical survival and stay away from doom and gloom. Survival situations are very real and they happen all the time, to regular people, on a regular day.
I consider anything that protects you, from the elements, as shelter. That includes your clothing, trash bags, mylar blankets, sheets of plastic, ponchos, tarps, rain gear, tents, sleeping bags, blankets, bivvies and even your fire kit. This is why shelters become cumbersome as they make up, or should make up, the majority of one’s Bug Out Bag. Once you add all of the “shelter” you realistically need to your pack, your bug out bag can become very large and potentially very heavy. Is that necessary? In my opinion, yes it is, especially considering it is the second most important thing that you can carry to keep yourself alive in a bad situation.
Many people load their bug out bags down with gimmicky items without even completely covering their bases with shelter. So, where does one get started with fleshing out your bug out bag with the proper shelter? I’m going to start with your body and work outwards.
Without going into great detail, you should have an extra change of clothing in your pack, to include good hiking boots. The clothing needs to be appropriate for your climate. Keep in mind that when it comes time to bug out, there is a good chance that the weather is going to be less than optimal. Think rain, blizzards, hurricanes, floods, or any weather where you are going to get wet and cold. Simply put, you should have an underlayer, mid layer and outer shell, bare minimum. That’s all I’m going to say about that. 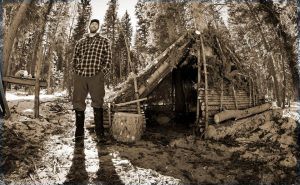 Next, you should have rain gear in addition to your outer shell. I go with good rain pants, a rain jacket and most importantly a big durable rain poncho. The poncho should be ripstop material, large enough to cover the majority of your body, heat resistant and have large grommets in it. Why so much attention on the poncho, you may ask? Because it doubles as a tarp shelter.
While we are talking about tarp shelters (or survival shelters in general), let me just remind you that you are going to need rope. I carry 200’ of paracord in my survival kit. If you know how to make primitive cordage, I still suggest you take 200’ because it’s so much faster an easier than making your own in the field.
Beyond items that are meant to go on your body, let’s talk about some basic things that you should have in your bug out bag or survival kit. Let’s start off with what most prefab kits have as their shelters. The ever famous Mylar blanket! While a Mylar blanket isn’t a bad thing, it should never be your primary shelter. It should be a backup to a backup, to a backup…to a backup You can use it to line the inside of your primitive shelter or tarp shelter to reflect heat back to you but should not be the only thing that you have on you.
They become very effective if used to reflect heat from a fire, back onto you. They are too thin to make any real shelter out of but they do help a little in certain circumstances. They do make great signal mirrors, however. Couple your Mylar blanket with a good solid tarp and a trash bag or two and you do have a good, solid emergency shelter.
First, string up your tarp shelter, tie the Mylar to the underside of the roof of the tarp, heap up some leaves to lie on for comfort and insulation and then place the trash bags over the leaves. If you build a fire outside of the tarp shelter, the heat will radiate onto you, any heat that passes you will reflect off of the Mylar blanket, back onto you and be absorbed by the black trash bag on the ground.
Oh, if you have one of those orange tube tents as your emergency survival shelter, those things are ridiculous. I’m pretty sure I mentioned gimmicky somewhere earlier. Get rid of it! Do you really want to stake your life on a $4 tube of thin orange plastic? Get yourself a good rain poncho, 2 Mylar blankets and some paracord. If you are going to carry a sheet of plastic, get yourself a 20’x20’ sheet of 6mil clear plastic from the hardware store.
It might be a little bulky but there is so much you can do with it. It’s one of my older videos but still, great info so check out the Super Shelter that we made in one of my classes here: https://www.thesurvivaluniversity.com/super-shelter. Other valuable items to add to your bug out bags survival shelter arsenal are tents, hammocks, ground pads and sleeping bags.
Of these, a full hammock sleep system is my favorite. If you don’t know what I mean by that, check out Warbonnet Outdoors for a quality sleep system. If you have ever slept on the bare ground with none of these items, for a prolonged amount of time, you will realize how important these items are. I spent a week in a lean-to, during survival training, in cold, rainy conditions, (uphill both ways) without any of these items. While my shelter was waterproof, having these items would have made life so much more pleasant. But let’s move on to the “fun” stuff. Primitive shelters.
To build a primitive shelter it helps if you have some tools. A good bushcraft knife and a folding handsaw will greatly speed up the process. If you can handle the weight, add a good axe or hatchet to this list. In my experience, as a survival instructor, I find that people want to overcomplicate things. During my classes, I tell people that it takes 3+ hours to build a reasonably sized lean-to. I typically I get a look like I’m nuts when I say it takes that long. It only takes 15 minutes in most Youtube, videos so why the heck does it take this survival instructor 3 hours to build one? It’s called reality.
In videos, you don’t see the harvesting of trees, limbing of branches, or gathering of leaves. All of these things take time. When I turn students loose to build their own shelters, sometimes I find them building either a huge shelter or some elaborate tree fort, and 5 hours later they are about ¼ of the way done.
I want to stop them and make them do something else but it’s a valuable lesson learned. The students that listened to me are sitting in their small yet cozy shelter, with a fire, drinking a cup of pine needle tea. So when it comes to building a shelter in a survival situation, keep it simple and keep it small. At least to start. You can build on later if you need to.
The very first shelter I suggest to build is a tarp shelter, simply to keep me dry. Unless of course, I have a big sheet of plastic or my Warbonnet. If so, I would always resort to one of them. Next, comes a fire, near my tarp shelter to warm me up. Next, I am going to build a lean-to and then attach my tarp shelter to it as a sort of canopy and move my fire so that I can tuck it under the tarp should if it starts to rain. Next, comes a reflective wall on the far side of the fire to help trap heat in, and/or reflect it back to me. If I intend to stay in that area for a considerable amount of time, I might consider a double lean-to or alpine shelter. 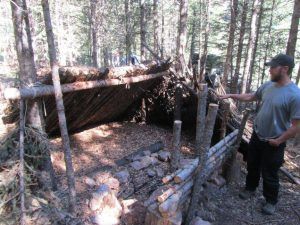 If you are unable to get a fire going and you are in a cold climate, the next shelter you should consider is a debris hut. I am not going to go into great detail as to how to build one of these because it’s easier to see it and build it than it is to type in words on how to build it. But basically, the debris hut is a wooden cave, covered with a ton of leaves and other debris. This shelter acts as a large sleeping bag and you use your body heat to warm its interior.
  And in wet, warm conditions I am going to make a jungle-hooch also known as an A-Frame shelter. This shelter keeps you up off the wet ground, away from snakes and is actually very comfortable if built right. All primitive shelters are far superior to modern shelters if built right but they do take a considerable amount of time to make them resistant to the elements.
To make a shelter resistant to rain, it takes roughly 3 feet of leaves piled up on its roof. 4-6 inches of leaves placed on the ground, as a bed, will keep the earth from sucking the heat out of you. If you have never built a primitive shelter, I highly suggest that you go out and build yourself one and sleep in it for a night with nothing more than the clothes on your back or what you carry in your bug out bag. For the sake of your safety, please do this in a reasonably controlled environment. 
![]() So, in closing, the most important thing that you should take out of all this is that you should have good shelter in your bug out bag and practice using your gear. Figure out what works, what doesn’t, and what gimmicky junk you have that you need to throw away. And practice your primitive shelter building skills. You should know how long it takes you to build the shelter of your choice and you should always have the modern gear so that you can quickly erect a shelter when time is of the essence.
So, in closing, the most important thing that you should take out of all this is that you should have good shelter in your bug out bag and practice using your gear. Figure out what works, what doesn’t, and what gimmicky junk you have that you need to throw away. And practice your primitive shelter building skills. You should know how long it takes you to build the shelter of your choice and you should always have the modern gear so that you can quickly erect a shelter when time is of the essence.
Essential Items to Have to Build Your Shelter
While some preppers may be comfortable carrying the extra weight and bulk of a tent, that piece of gear is somewhat limited in function. Tarps may not offer the same type of protection against the elements, but an informed prepper can construct a shelter from a tarp that rivals all but the most innovative tents.
Moreover, tarps can be used for numerous purposes-something that tents do not provide-thus justifying their additional weight and bulk. Unfortunately, with tarps, you will have to consider whether you want to use canvas-which is significantly heavier but also more durable-or some other material like polyurethane.
Another necessary item is something to fasten a guyline. While it is possible to get by with rope or thick twine, paracord is generally considered the go-to in this situation. Aside from the fact that it is often lighter than traditional rope while maintaining its structural integrity, paracord’s elasticity allows it to serve functions that rope cannot while still providing the same functions as rope as well.
Stakes are as much a necessity for constructing a proper tarp shelter as a guy line, though you might be able to get by without poles. The necessity of poles will depend on your region’s biome. For example, you are unlikely to encounter suitable sticks in the desert.
While not a substitute for tarps, ponchos can also be used to make an immediate shelter for one. However, military ponchos or products made in that vein are the only ones suitable for this purpose.
Like our content? Share it on social media!
Further Reading:
- Gimme Shelter! 7 Bug Out Shelters You Must Know How to Build | Know Prepare Survive
- Choosing The Best Shelter For Your Bug Out Bag – Part 1 | Survival Cache
- Bug Out Bag Debate: Tarp or Tent for Emergency Shelter | Prepare for SHTF
- How To Make a Tarp Shelter – 15 Designs | Preppers Will
- Rain Rain Go Away (Survival Uses for Rain Ponchos) | SUrvivor jane
Item List:
- Ground Pad
- Tarp
- Zip Ties
- Wool Blanket
- Survival Hammock
- Sleeping Pad
- Bivy
- Paracord Survival Kit
- Tent
- Sleeping Bag
PART TEN
Dressing for a Bug Out: How to Choose the Right Garments to Protect You from The Elements
Having covered the accepted fundamentals for survival, specifically water, food, and shelter, we now move on to the next subject which is just as important for ensuring survival, though technically humans can occasionally live without it: clothing.
Unfortunately, clothing will be one of the most consumptive items you pack both in terms of space and weight. In fact, only your sleeping gear may weigh more and occupy more space-though, the latter of those two considerations with respect to sleeping gear can often be alleviated by simply strapping the sleeping gear to the outside of your pack.

Things to Keep in Mind When Choosing Your Bug Out Clothes
This is likely the most important factor when selecting your bug out clothes. However, there is often a rule of thumb that can help guide you: always pack clothing for the worst possible scenario. In the case of survival, the worst possible scenario would be heavy rain at temperatures just above freezing with heavy winds.
There are a few reasons this is the case. First, snow is preferable to rain in almost every situation. It is far easier to keep dry during a blizzard than it is during a torrential downpour. Moreover, snow can actually be used as a makeshift form of insulation or shelter-something rain simply cannot do.
For temperatures just above freezing, this means the threat of hypothermia persists without the benefit of snow and its possibilities as a shelter or form of insulation. Instead, you are simply left to shiver the whole night through-a deadly position if compounded with rain or wind that will further accelerate the dissipation of body heat.
Keep in mind, that most dire of circumstances may not be much of a risk depending on your location. If you live in arid or desert terrain, you may still have to contend with near-freezing temperatures, but the odds that it is coupled with rain, drop dramatically-though wind may still be a serious threat.
Similarly, if you live far to the north, rain may not be quite a large problem and is instead replaced with temperatures that are well below freezing. In this instance, the most insulated gear will be far preferable to clothing that is waterproof-though, obviously, both would be ideal but will add more weight.
How Many Do You Need?
The general rule for the amount of clothing to pack is three changes of outfit. Keep in mind, you are not expected, nor recommended, to wear a change of clothes a day. In fact, you should probably wear a change of clothes for two to three days before changing them.
This conserves on the amount of energy and water you have to expend cleaning them. Moreover, if you have the “right” clothing, they simply do not require being washed after one wear. For example, denim jeans are not intended to be washed after wearing them one time-this applies in all contexts including, if not especially, general life.
The three changes rule may not necessarily apply to children who could very well require more changes due to their nature of making a mess-specifically by urinating or defecating on themselves. Still, due to their reduced endurance and carrying capacity, you should not simply fill their pack with nothing but clothes.
Finally, it is a good idea to bring along an extra pair of shoes for each member of your party. Often more than clothing, shoes are vital for survival unless members of your party have trained their feet to function in the wild without them. Regardless, shoes prevent injury which can be one of the largest threats when bugging out.
What Clothes are Essential?
Essential clothing may differ from place to place, but a good checklist-beyond the standard garb-includes gloves, hats, a coat, and a poncho-the latter of which we have already identified as useful for more than simply wearing.
Gloves should be functional in two important ways. First, gloves should keep your hands warm. This may not be a big deal depending on your location, but even deserts often drop by more than fifteen degrees at night. Also, the gloves should offer legitimate protection. They do not need to be industrial work gloves, but a simply wool knit will not offer much resistance to punctures or lacerations.
Hats can serve to provide insulation for your head, but a good bug out hat should primarily function to keep the sun out of your eyes and the rain out of your face. Similarly, a coat is generally used to provide warmth, but a proper bug out coat should also provide some measure of protection against precipitation-whether heavy or light.
Tips to Choose Clothes that Don’t Draw Attention
Finally, because people present an unusual risk in that they are far more difficult to predict and absolutely prepare for, your clothing should not draw attention to you. This does not necessarily mean that you need to wear nothing but camouflage, but you should avoid bright colors at all costs.
Anything that runs along the neutral spectrum is preferred to reds or blues that are rare in large amounts on dry land. Green is obviously an exception to this rule, though that too is location specific. Neutral colors, on the other hand, are found in pretty much every environment-even verdant ones.
Item List:
- Wool Hiking Socks
- Lightweight Long Sleeve Shirt
- Sewing Kit
- Shemagh
- Rain Poncho with Hood
- Medium Weight Fleece
- Stocking Cap
- Hat w/ Flex Brim
- Rain Poncho
- Working Gloves
- Fresh Socks
- Hiking pants
- Survival Gloves
- Underwear
- Safety Pins
- Hiking jacket
- Body Warmers
PART ELEVEN
Key Items for Lighting When Bugging Out
When bugging out, you expect to have to do without many of the more common amenities, but one that we always seem to take for granted is light. Because we are often afforded the convenience of light with the literal flip of a switch, it can be easy to forget what going without it is like.
Unfortunately, out in the wilds, being without a light source can lead to severe injury or death. That is why no bug out bag is complete without numerous sources of light. Of course, this once again becomes an issue of weight and space. Considering that the more sources of light you have the less likely all of them are liable to fail at once, it is better to carry many. Still, deciding which are worth their weight can be difficult.

Great Options to Pack for Your Lighting Needs
If you are setting up camp, you will ideally rely on fire for most of your central lighting needs. Of course, you should need to relieve yourself, fire is insufficient as a singular light source when camping.
The easiest light sources to justify are various forms of lightweight bulbs. The most obvious choice for this is the flashlight. They are cheap, plentiful, run on a readily available power source. However, the handheld flashlight is not the only option here.
Headlamps are a suitable substitute because they allow hands-free lighting and will track with the direction you look. Should you choose to travel during the night, headlamps are easily the best lighting option.
If you are concerned about drawing attention and do not need a bright source of light, chemlights are perfectly acceptable. Just be aware of their limitations and recognize that they are not often suitable for lighting walkways unless you get higher quality versions.
Lanterns are technically an option, but these sources of light can often add unnecessary bulk. Thankfully, there are numerous battery powered lanterns that are lightweight and plenty that are also compact. Oil lanterns, while a novelty, add more weight, with the necessity of fuel, than they are worth.
Jim Pierce – The Survival Place Blog
Follow Jim: Facebook | Twitter  There are lots of things to consider when bugging out and lighting is right up there towards the top of the list. Some of the things that come to mind would be:
- Traveling at night.
- Red colored lens for night vision and stealth movement.
- Lighting for around your camp.
- Comfort and security at night in the dark.
- LED tactical flashlight with S.O.S. signaling capabilities.
- Led vs. bulbs.
- Battery power.
As you can see there are more things to consider than just a flashlight. Will you be able to carry enough batteries to keep your flashlight operational for more than a few days? That’s why I think that LED is the way to go with a good set of rechargeable battery packs and the ability to recharge them. Led takes less power to operate so thus extending the life of your battery and flashlight.
There are plenty of small solar panels on the market that can be hung off your pack and recharge batteries during the day. There are now even small stoves made by BioLite that create 3 watts of electricity from the heat of your fire and use it to charge devices in real-time or store for later use with onboard 2600mAh battery. It also gives you means for cooking so it has multiple uses and power options is a great commodity to have in abundance.
Hope this helps give you some things to think about when and if you ever have to bug out. For more information please check out The Survival Place Blog for all things survival.
Further Reading:
- Lighting for Your Bug Out Bag | How to Survive It
- REQUIRED GEAR – Lighting | Bug Out Bag Builder
Item List:
- Candles
- LED Headlamp
- Batteries
- Survival Flashlight
- Mini LED Keychain
- Glowstick
PART TWELVE
Keeping Yourself Warm: Tips and Tricks to Start a Fire
There is a reason that the starting and use of fire are cited as one of man’s first and greatest discoveries. From a survival perspective, fire provides solutions to problems with a diverse range of spheres.
For instance, fire can provide light at night to allow travel if your party is in a location that is not appropriate for camp. More commonly, a fire will stave off the elements, providing warmth when none may otherwise be present. This function extends beyond you and your party and applies to your clothing, if they get wet, as well as your water or food.

Two is One, One is None: How Many Means to Start a Fire Should You Have?
Ideally, you will have as many means of starting a fire as is reasonable to carry. While that statement may seem fraught with subjectivity, the handy comparison of weight and space can make it simpler.
For example, if the method of starting a fire weighs a couple ounces and takes up less than three cubic inches-roughly the dimensions of a cigarette lighter-then the option should be a no-brainer. Matches, as well as flint and steel, fit into this category. Of course, there are also numerous other fire starting methods that come in complete packages.
These are perfectly acceptable and fairly convenient, though be sure that they are also exceedingly efficient. For instance, there are kerosene soaked tinder boxes that are excellent for starting fires. A single spark and the cotton or other fibrous material used goes up in flames.
However, it can be far too easy to overestimate how much of the material you need to start a fire. As such, you may end up using the material far quicker than its weight and size justify occupying space in your pack.
In this instance, it is a good idea to see how effectively each fire starting piece of equipment performs and compare that to its occupancy value. Keep in mind, the less space and weight the item demands, the easier it is to justify. Matches, for example, can be problematic as a single source, but their relatively light occupancy justifies their existence anyway.
Simple Ways to Start a Fire You Should Master
Flint and Steel - This is a method that has been effective since man stumbled upon the unique stone structure of flint that sparks while microfracturing. However, the days of striking flint onto dried grass are over.
Modern developments utilize flammable material that is far more malleable. For instance, the use of dried cloth specifically designed to burn serves as a much easier form of tinder than dried sticks and hay-especially since it is easier to manipulate.
Friction - Older than flint and steel, forms of starting fires with friction are the oldest methods of starting fires. Consequently, they are also the most labor-intensive methods of starting a fire-labor utilizing the limited resource of energy.
Of course, in certain instances, that expenditure of energy is vital. The easiest of these methods, in terms of labor, involves the bow drill. However, this method also requires a bit more preparation-a luxury you may not have if friction fire starting is your last result.
Magnifying Glass - This method is a bit more specialized in this scenario. Specifically, you need the sun or some similarly intense source of light for it to work. Of course, if your source of light is intense enough to start a focusing lens fire and is not the sun, chances are you can start a fire other ways with that same source.
Regardless, any type of lens that focuses light can be used to start a fire by centralizing the heat and energy of that light to a singular point. This can be an excellent method of starting a fire to cook breakfast and save on more scarce sources of starting fires.
Batteries and Steel Wool or Aluminum Foil - Both of these methods work along similar principles. Essentially, you use the electric charge of a battery to ignite a piece of thin metal. Depending on the metal’s composition, it will act as an excellent fire starter.
Steel wool may or may not be a part of your bug out bag. It can provide use beyond starting fires, but it may not necessarily make the cut-mostly because it is not as compact as one might prefer. The aluminum foil in question is best found in gum wrappers. Because if you carry gum with you, this should almost always be an option.
Key Items to Pack to Start a Fire
As mentioned in a number of the fire starting methods, batteries, matches, lighters, and a focusing lens should all be essential items in your pack. All of these items are small and relatively light, providing an excellent occupancy value.
Moreover, some of these items can be used for multiple purposes. For instance, batteries are kind of a must-have for a number of items you should already be otherwise carrying like a flashlight and a communication device. Likewise, the magnifying glass can assist should you need to repair gear and require a closer view.
Like our content? Share it on social media!
Further Reading:
- Do you have 5 Ways to Make Fire? | Survival Cache
- The $10 Fire Kit For Your Bug Out Bag | The Survivalist Blog
- 9 Ways To Start a Fire Without Matches | The Art of Manliness
Item List:
- FireSteel Fire Starter
- Tinder
- Windproof – Waterproof Lighter
- Tinder
- Small Magnifying Glass
- Waterproof Storage
- Waterproof Survival Matches
- Waterproof Survival Matches
PART THIRTEEN
Hygiene: Practical Tips to Keep Yourself Clean When Bugging Out
While not often seen as one of the more pressing needs when bugging out, there are a few points of hygiene that become vital during a survival scenario. Common conveniences like showers or baths can actually take a bit of a backseat when matters of life or death permeate.
Still, this is not a glowing endorsement for becoming a grub. Simply, when time and energy are limited resources that must be used as efficiently as possible, smelling good is not high on the priority list. Still, letting yourself go too far can be just as dangerous as trying to maintain an obsessive degree of cleanliness.

Why You Shouldn’t Entirely Forget About Hygiene during a Bug Out
When bugging out, it is not the small problems that kill you but the big ones. However, one a series of small problems stack on top of one another, they can quickly turn into a big problem. By that point, you have to invest so much time and energy in taking care of the problem instead of using it to survive that you run the serious risk of death.
With hygiene, this can occur in numerous ways. For instance, a small cut is generally not a big deal. Apply isopropyl alcohol or some other disinfectant and cover the wound. Similarly, unwashed clothing on their own is generally not much of a big deal. However, if you combine both of those small problems together, you can end up with an infection in the wound that becomes far more difficult to treat than fixing either of the two smaller problems that led to its origin.
Of course, this may seem to contradict the earlier statement about hygiene prioritization. Essentially, the main takeaway should be that you have a schedule for the various tasks of hygiene and stick to it.
It is far too easy to let hygiene slide what you are bugging out. Moreover, humans are especially good at adapting to emergent conditions. Even though you are used to taking a shower every day, you would be surprised how easy it is to ignore that task after bugging out for a few months.
A Few Easy to Follow Tips About Hygiene to Keep in Mind
As mentioned, the best way to ensure that you remain hygienic when bugging out is to keep a schedule of your hygienic tasks and stick to it as best as you can. Some of the tasks should be done daily, so they are easy to keep track of. Things like brushing your teeth are both quick and easy to manage.
Other tasks require the investment of time and resources. For instance, washing your clothes becomes far more arduous a task when you do not have a supply of fresh water. In this instance, you will need to use some of your water reserves-a use of that resource that should not be taken lightly. As such, it would make strategic sense for you to go a bit longer before washing your clothes.
Finally, some hygienic tasks only occur at the moment. For example, there are certain measures you should take to ensure that your feet remain healthy. However, should you develop a blister or soak a pair of sock, it is imperative that you address the issue as soon as possible-immediately if you can.
Survivor Jane – Survivor Jane
Follow Jane: Facebook | Google+ | LinkedIn | Pinterest | Twitter | YouTube | Instagram 
When and if the poo ever hits the sand, water will be gold. We can never have enough water in a survival scenario. Let’s put this into perspective, our bodies are made up of approximately 60% of water. We need water to live, period. But we also, need water to bathe, clean clothes and dishes and to cook with.
After a disaster, or in a survival situation, we will be working harder than most of us have ever done in our lives, resulting in us being sweaty and dirty, and more prone to injuries. Keeping clean will be imperative to preventing infection from those injuries. The balance is, learning how much water you “really” need to clean yourself, yet having enough water to drink, cook and clean.
How to Properly Manage Waste
Managing waste can be one of the most important needs when bugging out. This is especially relevant once you have reached your bug out location. At this point, you will be set up in a relatively permanent fashion and are more liable to let your guard down-running the risk of tainting your supplies.
Regardless of whether you are stationary or still traveling to your permanent shelter, there are a few rules for setting up waste locations. First, you should never relieve yourself uphill from camp. Over the course of time, the waste can travel downhill and contaminate your supplies or simply find its way onto your gear. Remember, you only require contact with trace amounts of waste to be exposed to dangerous bacteria.
Second, whatever method of waste management you use, you should expel the waste at least 200 feet from camp. Aside from the fact that this helps prevent contamination, it will also prevent wild animals from honing on your camp as quickly. In fact, it can also serve as a deterrent to many animals, warning them that your camp is nearby.
The two primary ways of disposing of waste involve either bags or digging. Bags are fairly self explanatory, though you will still want to bury the waste. However, the bag provides an extra line of defense against contamination. This is especially relevant if you have reached your secure location and have access to fresh water.
Digging can come in a couple forms. You can always dig a single hole, though this must be done each time you relieve yourself. However, this does help prevent the waste from accumulating, dispersing it over a wider range.
The other forms of digging involve two different types of trenches. One is a fairly deep trench that can serve you for two weeks at a time, while the other is a shallower trench that is only suitable for a few days depending on its size and proximity to other natural resources.
Remember to Take Care of Your Feet
As mentioned before, your feet are one of the most important parts of your body when bugging out. Granted, none of your body is truly expendable, but your feet, along with your eyes and hands, are arguably the most useful.
If nothing else, your feet may serve as your only means of transportation. As such, if you do not take care of your feet, you may end up slowing down or impeding your progress altogether. Depending on how far away your bug out location and supplies available, this can become seriously dangerous.
While watching out for blisters or other instances when your skin is weakened are obvious, other elements may not be so clear as to their importance. For example, a pebble may not seem like a big deal, but bugging out is a marathon, not a sprint.
Should that pebble create a hot spot or worse become lodged in your foot, you are simply allowing a small problem to develop that could eventually compound into a much bigger issue.
This is the same reason that you should ensure your toenails remain trimmed. Moreover, considering you are likely to walk for many miles-potentially for days-before reaching your bug out location, it is important to massage them to release tension, especially in the tarsals, plantar, and heel.
Further Reading:
- Hygiene in Emergencies | Bug Out Magazine
- Hygiene Items for Your Bug Out Bag | Survival Sullivan
- Staying Alive AND Clean: Survival Hygiene Rules To Follow | SASI
- Hygiene Best Practices That’ll Keep You Healthy Post-collapse | Survival Sullivan
Item List:
- Small Pack Towel
- Wet Napkins
- Bandana
- Travel Toilet Paper
- Travel Size Toothbrush & Toothpaste
- Tampons
- Dental Floss
- Hand Sanitizer
- All-Purpose Camp Soap
PART FOURTEEN
First aid: What you Should Learn and What to Carry in Your BOB
One of the biggest threats to survival when bugging out does not come from the disaster itself. In fact, people and predators are not truly the greatest threat to survival. No, the biggest issue you will face, outside of the environment, is the risk of injury.
We have been lulled into a false sense of security with ambulances and hospitals, but as people learned during hurricane Katrina, even minor injuries can become deadly. This holds true for surviving in the wilds than it does almost anywhere else.
Should you suffer a debilitating injury while bugging out, there is likely no one and nowhere for miles which can provide assistance. As such, your only options are to develop first aid skills beforehand or put the party at risk of death.

Common Injuries when Bugging Out and How to Treat Them
While it is technically impossible to be prepared for every potential injury you may endure while bugging out, there are a few which are far more likely to happen. As we have stressed the importance of taking care of your feet in a previous section of this guide, it should be understood that the sheer amount of walking in potentially treacherous terrain places injuries to your lower extremities at a much higher probability than other parts of your body.
In this instance, you will want to know how to treat these injuries to a better degree than say a rotator cuff injury. This is not to suggest that a shoulder injury is less dangerous to bugging out, but it is generally less likely to occur-unless you have to do a fair bit of climbing. Regardless, below is a list of some injuries that are more likely than others and ones you should know how to treat before bugging out.
One of the most important things to remember for a wide variety of injuries likely encountered when bugging out is R.I.C.E. This stands for Rest, Ice, Compression, and Elevation. Injuries to tendons, ligaments, muscles, joints, and bones will often call for this as the first response to treatment.
Blisters
If you develop a blister, you will ideally want to leave it intact. Opening a blister merely exposes you to the possibility of infection. However, if the blister presents too painful an impediment to walking, properly draining and dressing it may be called for.
In this case, you will sterilize a needle or something similar, puncture the blister, and allow it to drain. Do not pull off the skin as that will slow down the recovery period. Once the blister is fully drained, apply antibiotic ointment and dress the wound. Blisters: First aid | Mayo Clinic
Burns
Treating burns will differ somewhat depending on the severity, or degree. The treatment for a first-degree burn is not the same as for a third-degree burn.
Minor burns are fairly easy to treat. Cool the affected area and remove any tight bindings if you can. Apply vaseline or another soothing topical agent and dress the wound.
Major burns are a bit trickier. For one, you do not want to submerge the burn as this can lower the body temperature too much. Moreover, following the previous steps, you will want to keep the burned area elevated if you can. Burns: First aid | Mayo Clinic
Sprained ankles
Sprains are one of the more likely types of injuries you are liable to encounter when bugging out if for no other reason than because they are relatively minor and can readily occur at the ankle. However, wherever the sprain occurs, a similar treatment is called for.
The first thing you are going to want to do is to give the affected area a moment to rest. However, you will not want to wait too long to prevent swelling. Apply a cold compress for 20 to 40 minutes. Finally, wrap the area in an elastic bandage-a paracord and fabric can do in a pinch. When you rest for the evening, keep the affected area elevated. First-Aid Manual: Treat a Sprained Ankle | Backpacker
Mike Reed – Mike Reed Outdoors
Follow Mike: Facebook | Google+ 
One big thing I think people of all ages suffer from is heartburn and the best plant is a tree it’s called slippery elm, use it every day and it’s will cut the suffering of heartburn. Next pain meds willows of any kind streams alone are used for pain powdered bark that has almost the same effect of aspirin. And you will find vitamin c in pine needles, just steep and drink. You can also use blackberry leaves roots to cure diarrhea, make tea and drink. And if you have a toothache, white oak bark tea and the bark can be chewed to stop a toothache.
Knee injuries
The most common type of injury to a knee will either be a dislocation or a fracture. The first type of injury is treatable on the fly, while the second type of injury requires immediate medical treatment. Of course, this may not be possible when bugging out. Thankfully, both injuries require much the same treatment.
To treat a dislocated knee, gently but firmly position the knee in the anatomically correct position. If the patella has become dislocated, you will push the patella from the back of your leg as you straighten it out.
Once you have relocated the knee, apply ice for 20 to 40 minutes and wrap it in an elastic bandage. Then, splint the knee from the back, allowing a 20 to 30-degree angle, and use a crutch-fashioned from found items-or have a party member assist the injured person with walking.
For a fractured knee, the only difference in treatment is that you will not straighten the leg into an anatomical position first. Simply ice, compress and splint the knee. For both injuries, you will want to elevate the knee during periods of rest. Seek medical attention for a fractured knee as quickly as you can.
Bone and Joint Injury | Wilderness Survival Knee Injuries | Wilderness Medicine Newsletter
Torn ligaments
Treating a torn ligament in the field is similar to treating a fracture. Whereas a fracture occurs when a bone breaks, the tearing of a ligament is similar in terms of the type of trauma. Often, a sprain precedes a tear in terms of injury severity.
Much like sprains, you will want to give the area time to rest, then apply ice. After the ice numbed the pain and reduced swelling, wrap the injured area in an elastic bandage.
However, much like a fractured bone, this is the point where you will want to completely immobilize the area to prevent further damage. Finally, keep the area elevated once your party rests and seek medical attention at the nearest opportunity.
First Aid: Ligament and Tendon Injuries | 101 Ways to Survive
First Aid Items to Carry in your BOB
Even though a number of injuries we described call for you to stabilize a part of the body, it is not a wise idea to pack splints or slings in your bug out bag. With space and weight limited, those items can easily be fashioned with a combination of found items, paracord, and clothing. Instead, your first aid kit should include items that are either more specialized or need to be better protected. There are a few general categories that these types of items fall under: preparation, wounds, pain, and environmental.
Preparatory items include masks, sterilized gloves, antibiotic ointments, and antiseptics. These items prevent infection and the spread of illness. Moreover, they also assist in a quicker recovery. Of note, you can use ethanol alcohol as an antiseptic.
Wound items include gauze, duct tape, butterfly sutures, and super glue. These items are meant to prevent the loss of blood and close the opening so that it will not get infected and fester.
Pain items are meant to serve as an analgesic and include acetaminophen, aspirin, ibuprofen, cold packs, and stronger prescription painkillers-generally opioids. Again, ethanol alcohol can serve this function as well, making them exceptionally useful when bugging out.
Environmental items are first aid gear that allows you to deal with environmental issues. Bug spray, sun lotion, allergy medicine, and an EpiPen all fall into this category.
It should go without saying, but if you or anyone in your party requires prescription medication, you should obviously have store packed in every cache. If possible, stock up on over the counter alternatives to prescription medication to avoid potential legal issues.
Further Reading:
- 30 Things you should have in your Emergency First Aid Kits | Off Grid Survival
- The Risks and Hazards of Bugging Out | The Prepper Journal
- Common Foot Problems Everything You Need To Know | Foot Corner
Item List:
- Personal Medications
- First Aid Kit
- Survival Antibiotics
- Pain Killers
- Sun Screen
- Wound Gauze Roll
- Mole Skin Pads
- Surgical Tape
- Neosporin
- Band-Aids
- Blood Clotting Sponge
- Insect Repellant
- Hydrogen Peroxide
- Mylar Survival Blanket
- Sterile Alchohol Prep Pads
- Super Glue
- Tweezers and Nail Clippers
PART FIFTEEN
BOB Tools: Essential Items You Should Pack
Whether you are bugging out for the short or long term, you will likely come across an instance where you need to affect the environment around you. Some of these instances may be fairly coarse: laying branches or boards over muddy back roads to allow a vehicle to gain traction.
However, there are just as many, if not significantly more jobs that will require tools beyond your hands. Of course, for packing a bug out bag, this can get a bit tricky. With space and weight already the most limited resources you have, tools present the dual issue of being fairly heavy-even if they are compact.
Here is a list of different tools you should always have on hand when bugging out and why they are important.

Important Tools to Carry With You
Survival Knife - Ask any prepper and they will all tell you that a quality survival knife is by far the most important tool for bugging out. In fact, any outdoorsman worth their weight will reinforce the utility and value of a quality survival knife.
While you do not necessarily need an eight-inch ka-bar like Rambo, there are a few qualities you will want to look for. First, the blade should be at least three inches long, or it will suffer some with versatility. Though, if the knife is too big it will not be suitable for fine tasks, so aim to strike a balance.
The blade should be fixed, not folding, and should be made with a full tang. These two qualities will extend the lifespan of your blade and help prevent failure out in the field.
Multi-Tool - Second only to your survival knife, the multi-tool will be most useful for fine work that requires precision or dexterity. Keep in mind, many of the functions of general multi-tools can be accomplished with a survival knife, so look for features on a multi-tool your survival knife cannot replicate.
Pliers, Phillips head screwdrivers, can openers, files, and scissors are all priority components. Moreover, any minor repairs you may need to perform in the field should also have the appropriate tool component included.
While few will be without it, you really do not need to worry as much about the blade attachment of your multi-tool. If it is quality, that is obviously better, but you are unlikely to prefer it to your primary or secondary knife.
Secondary Knife - Because you never know what might happen out in the field, you should always have a backup to your most important tool. Your secondary knife can be slightly different-like having a gutting hook or something that is appropriate for your location-but do not try to get too cute with it. At the end of the day, your survival knife’s primary function is to cut things, and that should be what it does best.
Whetstone - While you may not bug out long enough to need to make use of this tool, you will not want to be found unprepared in case you do. Considering your knife is the most important tool for survival, it is vital that you ensure it remains sharp.
A dual-sided whetstone with hard and sharp Arkansas grit is great because they can sharpen somewhat quickly and put a solid edge on your blade. However, they are oil based, so keep that in mind. A water-based whetstone is more convenient to lubricate but will generally develop a dip quicker and need to be flattened more often. This also makes water stones become unusable quicker-though that is generally only relevant if you bug out for years.
Axe/Hatchet - Some of you may be thinking “this is an awfully heavy tool for a job that a knife can do.” While yes, a knife can technically serve some functions of a hatchet, it is far from a substitute. Moreover, it is a better idea to keep your knife sharp for other purposes-not to mention warp free.
A hatchet can also serve the vital function of a hammer-a tool that can make survival far easier. You will need to make sure the head is made from high-quality steel and weighs between two to three pounds. The head should also be single bit, while the shaft should be made entirely from hardwood.
Mike Lummio – Bushcraft Northwest
Follow Mike: Facebook | Twitter
 If you read ten articles on BOBs, you’ll likely get ten completely different ideas on what tools are important to pack. Here are just a few of the things I recommend and why:
Knife – Packing a huge Rambo style fighting knife is a mistake. If the rule of law still exists, a knife is considered a lethal weapon no differently than a firearm. If the social fabric has torn with law and order suspended, you are literally bringing a knife to a gun fight. A knife with a bladeunder four inches will do everything a knife needs to do and saves space and weight for other important items. If you want a tool for fighting, buy a gun.
Multitool – While much less important in wilderness environments, a quality multitool is a must have in populated areas with hundreds of uses.
Four Way Silcock Key – This tool allows access to public water fountains and spickets found on municipal buildings. Used responsibly in emergencies, this is an excellent way to refill containers when outlying water lines are broken.
Charging cables and charger – Maintaining the ability to communicate is crucial which means being able to keep cell phones, emergency radios, walkie talkies, and other devices charged up. The Eton Scorpion is a good choice as it is a radio (with emergency channels), flashlight, and has the ability to crank charge itself and other USB equipped items. The Brunton Metal 4400 and similar portable chargers are quick and easy but must first be charged themselves. Pack both kinds.
Titanium Lock Pick Set – While some may think this tool is carried for nefarious purposes, the reality is that burglars simply kick in doors and break windows to make entry. They don’t bother mastering a skill like lock picking. Being able to pick locks means you can escape bad situations without having to break gates, cut fences, or damage property. It’s a lot of fun, too.
Buy the Bogota Entry Card from ITS tactical but don’t carry them as a card. The picks are rather difficult to remove from the plate which takes valuable time, and they will also have sharp edges that need to be sanded smooth otherwise they stick in the keyway.
Folding Saw – Even though your multitool has a saw blade, it doesn’t take the place of a dedicated folding saw for processing firewood, building shelters, and other survival tasks. My favorites are made by Silky. Choose the Pocketboy for the most compact option or the Super ACCEL 210 for a larger model.
Mike Lummio is the owner and head instructor of Bushcraft Northwest where he teaches wilderness and urban survival skills to civilian, law enforcement, and military personnel.
Potential Additional Tools
Trowel - This tool is not an absolute necessity, but it can help make those latrine trenches much easier to dig. If you live in a region with cold, rocky soil, this will save you time and energy. Remember, your bug out bag’s resources might be weight and space, but yours are time and energy.
If a tool can save you enough time and energy, then it is likely worth the cost of weight and space. However, if you live in an area with looser soil, just stick with your hands, rocks, or tree limbs as a digging tool.
Machete - Regions with thick foliage and overgrown brush may call for you to carry a machete. However, people bugging out in the south-east may want to consider this tool carefully.
Keep in mind, time and energy become a factor when deciding whether space and weight are worth it. If the brush is so thick you have to constantly circumnavigate it or risk injuring yourself from a fall, a machete is probably worth taking.
Hacksaw - There are some fold up varieties of this tool that can travel extremely well. However, this is an issue where a tool is more specialized, but most of its jobs can be accomplished with other standard tools.
Either a survival knife or a hatchet can generally accomplish what you demand from a hacksaw. However, long-term preppers may want to carry this tool because it makes bushcraft construction much quicker and more precise.
Pry Bar - This is another tool that will likely get more use in an urban environment than in the wilds. Remember, there may be times you need to return to a populated region-especially for medical purposes.
However, this is not a tool you should keep in most bug out bags. However, if you have a bug out bag specifically for returning to an urban area, this tool will serve well in that specific place.
Further Reading
- 14 Survival Tools for Your Bug Out Bag | How to Survive It
- Long-Term Survival: These Are the 5 Tools You MUST Have in Your Bug-Out Kit | The Organic Prepper
Item List:
- Tough Compact Folding Shovel
- Survival Knife
- Portable Solar Charger
- Survival Hatchet
- Small Wire Saw
- Multi-Tool
- Machete
PART SIXTEEN
Navigation and Emergency Communications: What to Pack
Once you begin the arduous journey of bugging out, you should be prepared to rely on nothing but your gear and your wits. While it is fairly easy to prepare your gear, honing your wits can be a bit more difficult.
Aside from the investment of time required to ensure you know all of the different skills required to survive, there also comes the issue of know which skills are necessary in the first place. However, there are a few skills which are immediately recognizable as almost prerequisites for surviving in the wilds. One of the most important is navigation. You can have the best gear and an ideal bug out location, and none of it will matter if you are incapable of finding your way.

The Importance of Land Navigation with a Map and Compass
Because you should expect cellular towers and the internet to be down, Google Maps is unlikely to serve as an adequate method of finding your way from one place to another in the event that you need to bug out. In this instance, you will need to rely on the wisdom of the ancients and know how to read a map.
Thankfully, in terms of gear, reading a map, or orienteering, only requires two pieces of equipment: the map and a compass. Technically, if you know how to tell cardinal directions without a compass, you only need the map.
However, even the most grizzled survivalist can get turned around, and various environmental factors may make intuiting the direction difficult-especially at night. As such, it is recommended that you keep a compass on hand, even if you generally do not need it.
Regardless, when orienteering there are a couple tricks that can help you get up to speed-even with minimal experience. First, you will want to identify a landmark on the map. This can be anything from a mountain peak to a body of water. Once you have identified the landmark, this will provide a point of reference for you so long as you remain within eyesight of it.
The second trick to orienteering-though this one may require a bit of practice before you can use it quickly and consistently-is reading contour. Any map you use should be topographical in form. This means the map will present the rise and fall of ground elevation. You can use these slopes and troughs to get a general idea of where you are and where you need to go.
Keep in mind, orienteering can be a time-consuming process, even for experienced map readers-especially if you are in a thickly wooded area with no readily visible landmarks nearby. In this instance, you will want to make sure you have developed your skills at using a compass to get a bearing on your location. Just because you may be able to read a map without a compass, does not mean you should necessarily try to do so unless the conditions are favorable for such a task.
James L. – Plan and Prepared
Follow James: Facebook 
Hi, I’m James L. from Planandprepared.com. When asked to list what I think would be the most important survival tool to have on you, I’d pick my cell phone. A charged cell phone can help in about 95% of all emergency situations. Simply being able to alert others to your emergency condition and your location can save your life faster than just about anything else out there.
Essential Items for Communications During a Bug Out
When disaster strikes, current information is worth more than gold. Bugging out to your secure location will not do any good if that area is at risk of suffering a flood or wildfire. If you do not know what awaits you at your bug out location, you may travel to an area that is more dangerous than the one you just left.
Cell Phone - Pretty much everyone nowadays has a cell phone. Depending on the time frame and the scope of the disaster, this can serve as an adequate early form of communication. However, be prepared for cell phones to fail suddenly.
Interestingly, cell phone service is far more likely to fail due to signal crowding more than tower failures. Granted, if the disaster is large enough and powerful enough, regional cell towers may be knocked out of commission, but it is the influx of every person in a given region trying to send messages or make calls simultaneously that is most likely to prevent cell phone communication from working.
Walkie Talkie - Walkie talkies are a convenient, if limited form of communication. Even if you have a high-quality walkie-talkie with a greater than average range, you will still be far more limited than all of the other methods of communication listed.
Still, walkie talkies can serve as an excellent method of communication between the members of your party if, and when, cell phones go down. Walkie-talkies allow the group to split up-though staying within a relatively close range of one another-and maintain contact.
CB Radio - The effectiveness of CB radios will be wholly dependent on your location-both starting and ending. While CB radios have a significantly longer range than walkie-talkies, they are also limited to a central receiver. If the CB radio is out of range of a receiver, it will cease to function.
Because of the weight, a CB radio should only be located at your bug out location, not carried with you. One advantage of a CB radio-over a ham radio, for instance-is that you do not need a license to use it.
Ham Radio - This is arguably the most effective method of communicating with the outside world during a large scale disaster that lasts more than a few days. However, ham radios generally require you to be licensed to use.
Of course, you can always skip the broadcasting component and simply use a ham radio to listen for local updates. Unfortunately, much like the CB radio, ham radios are too heavy and big to justify carrying in your bug out bag and should only be located at your bug out location.
Shortwave Radio - Whereas walkie talkies should be your favored form of carried communication, shortwave radios should be your preferred form of carried information. You can get a durable and lightweight shortwave radio that is powered by a crank.
Because of the extreme signal distance using the atmosphere to reflect shortwave signals, most governments will use shortwave signals to broadcast emergency information and updates. As such, even if a major disaster causes widespread catastrophic consequences, there is still a good chance shortwave radios will provide valuable information-potentially for years.
Like our content? Share it on social media!
Item List:
- Small Note Pad and Pencil
- Compass
- Small Signaling Mirror
- Emergency Whistle
- Local Area Map
- Protected Smart Phone
- Two-Way Walkie Talkie Radios
- Crank Power Charger
- Emergency Radio with Hand Crank
PART SEVENTEEN
Miscellaneous: Documents, Money and Other Items You Must Carry
It might be common, and reasonably intelligent practice to prepare for a disaster from which civilization cannot recover, but a far more likely scenario involves you needing to bug out for a far more limited amount of time-between a week to a couple months. As such, the contents of your bug out bag needs to be prepared for both a long-term and a short-term venture.
Long-term bugging out is, counterintuitively, a bit easier to plan for. Short-term bugging out requires that you consider the items which either have incredibly specific uses or are necessary only after disaster has subsided. To that end, some of the most important pieces of gear you can pack are almost entirely useless during an extended bug out but inescapably vital for short-term sojourns. The most prominent of these gear is your official documents.

Important Documents You Shouldn’t Forget to Pack
Even in the event of an extended bug out, chances are that it will end at some point in time, and things will return to some semblance of normalcy. In that instance, you will definitely want the various forms of documentation that can prove who you are, what you own, and different legal relationships that you hold.
For example, say a nuclear explosion rocks a major metropolitan area that you happen to live in or close to it. Thankfully, you did your research ahead of time, picking a bug out location that was upwind of general regional weather patterns, so you do not have to worry about fallout.
However, it will only be a matter of time, before first responders have cleared the area for people to return. In fact, a single nuclear payload will only remain seriously threatening for about forty-eight hours. After that time, the radioactive decay and dispersal from weather patterns will reduce the radioactivity to safe levels.
The point is, unless civilization as we know it collapses, you will still be able to return to your home in a prudent amount of time-whether you want to or not is another matter entirely. With that in mind, we have come up with a list of documents that are important to keep with you in various forms as you are bugging out when you are more likely to return once the disaster has subsided.
Identification - The government uses numerous types of identification, each serving a different purpose. To prevent you from being restricted in access or options, it is important to keep the various types of identification on your person when bugging out. These include:
- Driver’s License
- Passport
- Social Security Card
- Birth Certificate
Medical - This is good information to have whether your bug out lasts a few days or a few years. If you or any member of your party has a health condition, takes medication, or suffers from any other health issue, it is important that any medical professional has access to that information should they need it. As such, you should make sure you have these documents on your person when bugging out:
- Medical records, including blood type
- Prescriptions for medications
- Names and addresses of health care providers
- Health insurance information
Economic - In the more likely event that a disaster will pass and you need to return to civilization, it is important that you have a record of your financial holdings and information to prevent a second, more personal disaster from occurring. These records include:
- Credit and debit card (copies of front and back)
- Deed to house or rental agreement
- Vehicle ownership papers
- Vehicle insurance and registration
- Documents related to employment
- Living will
Relationship - You never know what building may suffer damage in the event of a disaster. If it is a government record center, the various legal relationships you have with other people may become difficult to prove. Because of this, you should always have these records on hand:
- Marriage certificate
- Divorce papers
- Child custody papers
Qualifications and Certifications - Finally, you need to make sure that whatever hard work you have put into previous qualifications or experience will not be lost. Moreover, you need proof that you are allowed to have or do the things that you are entitled to.
- Diplomas
- School transcripts
- Military documents
- Weapon permits
Money: How Much You Should Carry
You never know how a situation may devolve when bugging out. Regardless of what happens, though, there is always a real chance that you may run into or need to make contact with other people. In these instances, it is always better to be in a position of leverage or utility.
For example, just because you are well prepared to bug out at a moment’s notice does not mean that most people are. Unprepared people are liable to be scared during a disaster. This can make them dangerous in a variety of ways-whether they become more predisposed to violence or simply try to glom onto your party.
Either way, having some cash can often entice them to be on their way. Similarly, a disaster will likely be met with police or military personnel as they try to lock down dangerous or classified locations. However, those guards are still human beings and as susceptible to the temptations of a subtle bribe as the rest of us. Remember, after the Nazis shut down the German border, people still somehow managed to make it out of the country.
Ultimately, you will want to bring enough cash that you can barter or bribe if necessary but not so much that it begins to occupy too much weight or space. $1000 is a nice round number that can also get you out of a couple tight spots.
It is important to remember not to put all of your cash in one spot on your pack. If the guard you are bribing thinks he or she can get more out of the situation, the unscrupulous sentry is liable to put the squeeze on you.
Moreover, it is important to keep different denominations of cash. Someone may sell you a medicine that you did not expect to need for $20. However, if you only have $100 bills, they are unlikely to be willing to break change and will simply demand the five times payment instead.
Other Documents to Consider
There are a number of other assorted documents which are not quite as necessary for survival in the modern world but whose absence can make your return to civilization more difficult than it needs to be. For example, you would hate to have to put down the family dog just because you could not prove its vaccinations were up to date.
You should also ensure that all members of the party carry current photos of all other members of the party. This way, if someone becomes lost or never makes it to the rally point, you can expedite their recovery.
Ideally, you will have all of this information in a clearly labeled and organized physical binder-one for each bug out bag if you have multiples. It can also be helpful to keep copies of all this information on thumb drives which can travel more easily-though they can also be susceptible to EMPs and should not be relied upon as the only format you keep the information.
Further Reading:
- The #1 Thing Missing from Emergency Evacuation Plans | Primal Survivor
- Bug-Out-Bag Papers and Documents | Modern Survival Blog
- What documents do you need in your bug out bag? | Graywolf Survival
Item List:
- Garbage Bag
- Survival Watch
- 550 Parachute Cord
- Binoculars
- Drivers License or Passport
- Latex Tubing
- Family Photos
- Mosquito Head Net
- Gas Mask
- Playing Cards
- Resealable Bags
- Electrical Tape
- Rechargeable Batteries
- Sunglasses
- Sewing Kit
- N95 Face Mask
- Fishing Kit
- Cotton Bandana
- Camo Face Paint Sticks
- Carabineers
- Personal Credit Cards
- Duct Tape
- Snare Wire
- Condoms
- Cash
PART EIGHTEEN
What You Need to Know About Self-Defense when Bugging Out
While a sad truth, it is a necessary consideration of any well-prepared bug out plan to include the need for self-defense. Some people may suggest that self-defense will apply more to predators in the wild than to human threats, but that is an assertion that goes against what most zoological evidence suggests.
Still, weapons can be useful to secure sustenance-especially if hunting small game, since large game is generally too heavy and takes too long to properly clean to be useful while traveling. Of course, hunting big game can be a great way to securing food once you have already reached your bug out location.
Still, the primary threat to your survival that would require self-defense is people. People are unpredictable, and even a well-armed and prepared party can find themselves in a situation with an injured party member should another hostile person prove desperate enough.

Weapons: What to Consider when Picking One for a Bug Out
The most effective line of self-defense will be your firearms. However, each type of firearm is more applicable in different situations. For instance, other people are less likely to be a threat at the distances that rifles would be called for.
In this case, a better tactic would be to hide and wait for the people to pass or backtrack and go around them. Still, it is important to know what each type of firearm is designed for and to decide whether its specific purposes best fit in with your plans or not.
Pistol - When it comes to dealing with hostile people, a pistol will be your best bet. Pistols check so many boxes for survivalists that not carrying one is a huge mistake. .
First, pistols are small and easily concealable. If a person intends to do you harm in a survival scenario, they likely intend to do so whether you are armed or not. However, giving them warning ahead of time simply allows them to prepare for that risk. Of course, if they approach you and then find out you are armed, they may decide it is better to let you pass without trouble.
Pistols are fairly accurate with training, can provide decent stopping power, are accurate to medium range, and have lighter ammunition. Altogether, pistols are some of the most economical choices for bug out firearms. The fact that a pistol can easily be used to hunt small game only increases their versatility.
Rifle - Rifles can be either a boon or a detriment to self-defense-it all depends on which type of rifle you use. Essentially, the action of your rifle will determine in which scenario it is most effective.
For self-defense purposes, assault rifles are the only rifle to use. If you find yourself in a situation where you need to use a bolt action, lever action, or the like, then you will have to make do. However, the amount of time between rechambers and reloads is simply too much and too chaotic for all but well-trained individuals.
However, semi-automatic rifles are often heavy, use heavy ammunition, and are accurate at shorter ranges than bolt or lever action rifles. This means that semi-automatic rifles are less effective for big game hunting once you reach your bug out location. As such, whether you opt for a semi-automatic rifle or a different type will depend on your bug out location and the possible uses you can expect to get from each.
Shotgun - Shotguns can be seen as situationally similar to pistols but carry many of the negatives of rifles. For example, shotguns are large and heavy, making them difficult to conceal. Moreover, shotgun ammunition is heavier than pistol rounds and many rifle rounds as well.
Shotguns also have the added disadvantage of only being accurate at shorter ranges. However, this makes them ideal for anti-personnel uses with self-defense. Moreover, because of their spread, shotguns do not require nearly as much skill from the user to remain effective.
Finally, shotguns are excellent weapons to hunt both large and small game-though they generally require a higher degree of hunting skill, not necessarily shooting lookout, to sneak up on larger game without a stand.
One thing to keep in mind with both rifles and pistols is caliber size. A larger caliber will provide more stopping power but also significantly increase the weight. That is why it is advised that survival rifles and pistols use .22 caliber ammunition.
This ammunition may not have the same kind of stopping power as larger calibers, but it is often more than enough to detract both predators and people alike. Moreover, this ammunition is cheap, compact, and light compared to larger calibers.
For shotguns, the important thing to remember is that slugs defeat the whole purpose. Yes, they have more stopping power and are more effective for hunting, but they also lose the spread that makes shotguns so attractive for self-defense purposes in the first place.
The Four Levels of Alertness and How to Apply Them
One of the biggest components of self-defense is being aware of threats before they are aware of you. If a person or predator gets the jump on you, it does not matter what types of firearms you have on hand.
As such, it is important to practice situational awareness at all times when bugging out. This can also be done in your daily life and will make you better prepared for risks and threats in that area as well. However, the same type of situational awareness practiced in a city is not the same kind you will practice while bugging out through the wilds.
One handy system to help you remain alert and assess a threat is to use “Coopers Colors.” This system was devised by Col. Jeff Cooper, a US marine during WWII and the Korean War. This system can be broken down into a four color-coded approach for assessing and responding to threats.
White - This is the state of being completely unprepared. If a threat arises and you are in a state of white alertness, you will suffer from delayed response time and place yourself at a much higher risk for injury or death.
Thankfully, if you are reading this, chances are you rarely exhibit a state of white assessment condition. However, this does not mean that you cannot be caught off-guard-especially if you become overconfident.
Yellow - The yellow condition is a relaxed state of alertness. This condition is not actively planning to react to a perceived threat but is instead keeping a lookout for potential threats on the horizon.
Preppers are most commonly found to exhibit this condition as their base condition aside from a few instances when guards are inherently let down-like when asleep. This is the condition one should strive for as their base.
In the yellow condition, you keep your head up and your eyes scanning. You are aware that a threat can appear at any time but maintain a control over your physiological and emotional state so you do not exert more energy than is necessary for the situation.
Orange - This condition is the next rung of threat assessment when a potential threat has affirmatively been identified. Keep in mind, hearing a noise should raise you to an orange condition with caution as this may cause potential threat perception to escalate to a red condition when it is not called for.
Instead, a yellow condition should still be practiced until the threat has been positively identified. Still, once that occurs, you should begin assessing the situation, quickly analyzing the threat, possible routes for retreat, and potential plan for engagement should it come to that.
Orange condition should ideally occur at an accelerated pace compared to yellow condition but not as quick as red. As such, an orange condition should not rely on pure instinct and should still utilize your reasoning abilities. You can resolve potential threats in orange condition depending on the solution.
Red - This is the condition of engagement with the intent to kill. This condition should only be utilized when the threat has been positively identified and there are no other solutions. Keep in mind, this does not necessarily mean that you have to pull the trigger once alerted to the red condition.
However, you should be prepared to act at a moment’s notice and without hesitation. Still, once you have activated a red condition, you need to continue using the available clues to prevent an unnecessary use of deadly force.
It is admirable to defend oneself against a viable hostile threat where another person intends to do you harm. However, it is a tragedy for a jumpy person to shoot another who only had a cell phone, and there is no justification or forgiveness for such a mistake that could have been averted with better training, tactics, and awareness.
Four Guidelines to Follow When Facing a Threat
Should you find yourself in an orange or red condition, there is an appropriate rate of escalation. Remember, you do not want to have to use your firearm if it is not necessary-and there are tactical reasons for this beyond a sanctity of life.
For one, when you use a firearm, you will alert your presence to other potential threats. Depending on how well-trained the first threat is, you may put yourself in a far more dangerous situation than you otherwise started with.
Hiding - This should always be your first line of defense. Granted, this defense technique is most effective when you have not already been spotted, but it can also be effective if you have been spotted at a distance.
Your clothing can help aid in hiding, but other methods can aid in this endeavor. Depending on how much time you have in the immediate preparation, creating a distraction can provide excellent cover to allow you to hide even once spotted.
Fleeing - Because fleeing ultimately puts you at risk of being seen or tracked, it should be considered a second line of defense. However, fleeing may actually be a better tactic than hiding should you recognize the threat before the threat sees you.
In this instance, you should stay low to the ground, walking in a crouch, and always keep your eyes locked on the threat. Should you need to flee from a close proximity threat, utilize a zig-zag patterned path and try to keep trees or other obstructions between you and the threat.
Firearms - If you are unable to hide or escape successfully and must confront a threat head-on, it is always better to do so at a distance. This provides you not only with the protection of distance, but numerous tactical options as the conflict continues.
The two most important aspects of firearm combat involve battlefield control. The first thing you will want to do is find some cover. Keep in mind, a wall or door is unlikely to provide adequate cover from high-caliber ammunition. In the wilds, a large boulder, thick tree, or sharp contour can provide excellent cover.
The second component of battlefield control involves elevation. High ground affords numerous advantages and should be sought if it is possible. High ground makes it easier for you to target a threat and makes it more difficult for the threat to target you. Moreover, it is far more difficult, time-consuming, and energy sapping for a target on the low ground to cover distance than it would be for you at the high ground to do the same.
Fighting - Hand-to-hand combat should actually be the last line of defense. For one, the closer you are to proximity with the threat, the more likely you are to be injured or killed. Moreover, unless you are trained and in good physical condition, hand-to-hand combat is a messy and exhausting affair. Keep in mind that there is a reason professional fighters rarely fight for more than five minutes in a round.
Regardless, it is still advisable that you receive some training in hand-to-hand combat. You do not necessarily need to be a “black belt” in any discipline, but understanding various defensive maneuvers can save your life. Judo, Jiu-Jitsu and Krav Maga are all excellent styles that favor defense over offense.
Item List:
- Firearm Ammunition
- Pepper Spray
- Takedown Survival Bow
- Pepper Spray
- Handgun
- Takedown rifle
PART NINETEEN
Too Heavy? Tips to Reduce the Weight of Your Bug Out Bag
More than limited space, limited weight is the greatest foe a prepper must contend with. There are a variety of ways to repack or organize the gear you carry so that it can all be carried effectively without putting an unnecessary imbalance on you.
However, rearranging the gear in your pack only makes it more balanced and easier to carry for longer periods of time or over treacherous terrain. Reorganizing gear in no way removes the total amount of weight in your pack.
As such, once you have figured out what types of gear you need to carry with you, your next step should be in identifying how those various pieces of gear can either be combined, lightened, or potentially eschewed from your pack altogether.

How to Lighten the Load
The best way to lighten the load of your pack is to simply carry less gear. We have spent the vast majority of this series detailing the different types of gear that you need and how much of each type to carry. Much like with school, we did that to provide you a solid base of knowledge.
Now we are going to do what secondary school does and tell you to forget all of it. Granted, we do not mean that you should just ignore everything that was said in the previous sections, but now that you have a better grasp of what is required to bug out, you should also be able to distinguish where those rules can bend.
For instance, we stressed the extreme importance of water. We are not taking that statement back as water is the second most necessary component for life-after oxygen which is readily available. However, the rule of bringing three days worth may not necessarily apply to all people.
If you live in a water-deprived region, like a desert, that may still apply. However, with the appropriate water purification methods and a thorough scouting of your region, you should be able to get by bugging out on much less water than three days worth. The same could also be said for food.
Survival Training
Knowing how to properly make use of the resources around you can often go much further than any supplies you carry. For example, if you live in a region that readily grows a number of edible and nutritious roots or tubers, you can free up a great deal of space and weight bringing little food.
The weight of this gear can be further reduced by packing only exceedingly dense food like high-protein bars. Still, humans survived for millennia not by hunting, but by foraging. Assuming you are properly trained and educated, there is no good reason you could not do the same.
Similarly, the need for a tent or a sleeping bag may not be as much of a necessity as you expect. Depending on where you live, you may not need any cover at all. Sure, it can be comforting to have a measure of protection against the elements, but when we are talking about survival, comfort should be a small consideration to the grander issues at hand.
Still, there are few biomes that exist where humans did not devise some method of both constructing a shelter and keeping warm. If you live in a heavily wooded area, this should be fairly simple. However, even those living in rocky or arid climates can learn to build quick shelters that protect them from both moisture and temperature.
Depending on how much research and training you do, you may find that your environment provides a wealth of resources that allow you to reduce the weight of your pack dramatically. For instance, there are numerous plants that can serve as an insect repellent, topical antibacterials, and even analgesics.
JJ Johnson – Reality Survival
Follow JJ: Twitter | Google+ | LinkedIn | YouTube | Instagram 
First be sure to limit the overall weight to about 20% of the body weight of the person carrying it. I have found that this amount is usually tolerable on a long hike for an untrained person to carry. Of course, if the person is trained and used to carrying a heavy load, by all means, go heavier if needed. But 20% is a good starting point for most who are not used to carrying a pack over long distances.
Second is not to forget a small gun cleaning kit. If a situation is so dangerous that you have been forced to leave your home then you likely will want to bring a firearm or three with you. Hiking over long distances with firearms will get them dirty and since you will be relying on them to defend your life you need to be able to give them a good cleaning so they will stay reliable.
Multi-Use Gear
Ideally, every piece of gear you bring should perform numerous tasks. Furthermore, a wealth of survival and engineering knowledge can allow you to quickly repurpose various pieces of gear for different tasks without losing their inherent integrity to accomplish what they were designed to do.
Keep in mind, the rule of “one is none, and two is one” may sound nice, but it also creates an excuse to bog yourself down with more gear than you need. Even though the additional gear may come in handy should the situation arise, you need to consider whether the additional weight places more of a potential risk in terms of balance and energy exertion than the redundancy is likely to encounter.
Another alternative to this problem is packing specialized gear that is ultimately lighter than the second item. For example, it is often seen as a necessary component to pack an additional pair of boots when bugging out.
While protecting your feet most certainly is paramount, is carrying another pair of boots truly necessary? Unless you are spending hundreds of dollars on specialized hiking boots, chances are the weight of an additional pair could be saved simply by packing additional soles and glue instead. You will almost certainly find a use for industrial adhesive glue, and the soles without uppers are much lighter and save far more space.
Further Reading:
- 7 Ways to Lighten Your Bug Out Bag | The Prepper Journal
- 6 Strategies to Lighten Your Bug Out Bag | Willow Haven Outdoor
- How to Lighten Your Bug Out Bag Using the 80/20 Rule | Know Prepare Survive
- How I Built My Ultimate 25 Pound Bug Out Bag | Graywolf Survival
PART TWENTY
How to Keep a Low Profile When Bugging Out
Whatever dangers the natural world poses when bugging out, they pale in comparison to the dangers presented by people. Keep in mind, this is not a simple “greater than, lesser than” equation. The dangers are different more than directly comparable.
For one, people can actually cause or exacerbate the natural dangers-especially if they steal your supplies. On the other hand, people present far more possible solutions than the hard, unforgiving physical limitations of the environment. Still, this merely highlights the primary danger of people: chaos.
Humans may be predictable in groups, but that same assessment does not hold for individuals. Single humans or small groups can vary so drastically, it is difficult to prepare for every possibility. However, you can still make preparations for the most probable scenarios encountered and how to avoid or overcome them.

Keep People Interaction at a Minimum
The first thing you will want to do is avoid people altogether at all costs. There may come an instance where interaction with people is necessary-like a party member suffers a compound fracture of their femur-or unavoidable-like meeting on a trail.
However, it is still advisable to consider the situations in which you may run into people when devising your bug out plan. Whenever possible, consider first where different types of people are liable to be found, and then avoid those locations.
For example, most people during a disaster will evacuate to the nearest large population center. Some will evacuate to a friend or relative’s house nearby in a lightly populated area if they can. Regardless, both of these areas are to be avoided when bugging out.
While your bug out location is unlikely to be located in either type of area, it can still run along such a route. However, even a solid route can take you across the path of other well-prepared people similarly bugging out properly.
Whatever the scenario, if you should come across other people when bugging out, the best thing to do is hide and wait for them to pass if they do not see you. If they do not move on, then you should backtrack and go around, giving the people a wide berth of a few hundred yards-at least out of earshot.
Take into Consideration OPSEC
OPSEC means operational security. This generally applies more when you have reached your bug out location or before you start your journey, but some of its principles can apply when you are moving as well.
OPSEC was designed by the military to examine why certain combat operations failed. While many of the elements of OPSEC have actually been covered in previous sections and are integral to making a proper bug out plan in the first place, there is a specific element that applies more to the act of bugging out than others: informational security.
Basically, the fewer people who are not a member of your party know about your bug out plan, the safer you and your party will be. As such, this means that you should avoid talking about your bug out plan both before and during its execution.
Do not let people know where your bug location is nor which routes you intend to take-even if they are a trusted neighbor. Unless they are a party member, the details of your bug out plan should remain a secret.
Don’t Reveal your Preps
Another piece of information that should be withheld both before and during a bug out situation is the content and extent of your supplies. This is important for two reasons, the first is more obvious while the second less so.
The primary reason that you do not want people knowing what kind of and how many supplies you have is because they are liable to desire them in the event of a disaster. Once disaster strikes, humans return to a more instinctual mode and scavenging is one of the best survival tactics. If they can scavenge from a well-stocked supply rather than having to scrounge for disparate items individually, all the better.
The other reason you do not want to let people know what supplies you have is because this will actually inhibit them from developing their own stockpile. Granted, not all people will follow this trend, but if your neighbor believes you to be “buddies,” then why would you not share your supplies would be the thinking.
Of course, you have to look out for those closest to you-as should your neighbor-but that will not stop him or her from expecting assistance when disaster strikes. However, if they believe you are in as dire straights as they are, they are less likely to create a potential problem expecting to rely on your resources.
Selco – SHTF School
Follow Selco: Twitter | Facebook 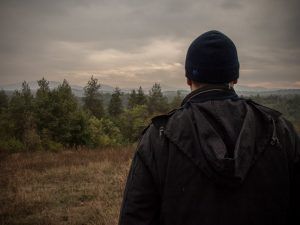
The concept of “gray man” in shortest could be explained as “being completely not interesting (not sticking out) in any field of preparing and everywhere until you are forced to do differently”.
In other words, you need to look and act like people around you, you need to blend in.
Easier is to show it on examples.
Other people and you
Let s say you are living in a nice part of the city and you are a prepper, and you are trying to convince other people around you that they need to be preppers too because of weather events, North Korea, asteroids or whatever.
By that action, you are clearly falling out from “gray man” concept.
Why?
Because you are clearly one prepper among the whole bunch of the people who are not preppers, you are sticking out!
When SHTF lot of them gonna pay visit to you and your home because they gonna know you have food, water, ammo antibiotics or whatever.
“Gray man” concept says if the majority of folks around you (in your street, job, gym) are completely not aware how fragile world it is you need to look and act just like them.
Keep your preparing and survivalism for yourself, your family and home.
How you look (act, live)
It is fun maybe to walk in camo pants with a cap that says “I love Glock” or similar, but stop for the moment and check what that says about you.
Maybe that says that you love tactical equipment, and guns, maybe it says you are a cool guy.
But also it might say that you are a guy who has a lot of interesting stuff at home.
Especially when SHTF.
Even when SHTF, that still does not mean that you need to look and act like some “prepper s dream” (?) going out full tactical with a weapon.
Maybe (most probably) when SHTF on your way to bug out location there s gonna be more folks.
They gonna look scared, terrified, they gonna be dressed in everyday clothes, having sports backpacks with themselves or simply stuff that they grab in hurry.
Do you want to stick out like a perfectly prepared guy in 150 desperate people?
No, you need to look like they look.
So for example, maybe for particular scenario during your bugging out, simple everyday clothes and travel bag have more sense than full tactical stuff.
You can not stick out! It is dangerous.
World around you
When SHTF you need to blend in, being „grey“ means being not interesting (not sticking out) because you blend in perfectly.
You can not blend in if you do not know people and world around you. It is absolutely imperative (?) to know how the world works in the area that you planning to be (operate) when SHTF in order to blend in.
By the words “how the world works” I mean what kind of people, groups of people, customs, religions, “myths” there are.
It is very stupid to expect that you gonna survive only based on your preps and skills, sooner or later you will need to interact with other people so you need to know them.
Set aside your preconceptions (if you have it) about people that are different than you and try to learn as much as possible about them.
When SHTF people tend to look for similar people and groups of people based on religion, race, beliefs, territorial affiliation (?) or any other common thing that can bond them.
Being part of something is good, being different from the people that you ran on (during your bugging out for example) can be bad.
Know at least basic customs of people that are different from you (and are close to your path), religious customs, things that can insult them, things that work or not work.
Try to learn different languages or accents, or greetings, or even very basic things that pose you as and friendly for example.
During a real SHTF event, people are let s say more sensitive when it comes to that things, and the system is gone so you are gonna be a man who will solve your problems with other people.
Think about this too:
-you want to be tough and prepared, but not necessary to look like that
-keep any interaction with other people at minimum, until it is necessary (but keep in mind always fact that you cannot “stick out”)
-violence is a tool, it can solve a problem, but it can bring more problems and more violence (pointed at you), so choose wisely when to use it
-if you choose violence then use it on the fast and brutal way, do not hesitate, and then move on
-people are nice because times are nice ( the system is there) when times get rough think about anybody as possible threat until proven otherwise
-do not have fancy stuff with you, fancy stuff draws attention and brings questions and chance for problems
-do not think in “normal life” terms when SHTF, rules are different, stealing may be aquiring, or obrtaining, running away may be saving your life to fight another day…
-be prepared to lose everything on you (for example your BOB) if that means you gonna survive (for example throw away your cool items from BOB if you need mobility in a moment)
-be ready to constantly adapting, in terms of bugging out it may be taking completely different way from planned, or a much longer time
If you want to learn more of Selco’s experience during the Yugoslav wars check out his flagship course “The Survival Bootcamp” and take your survival knowledge to the next level!
Dress to Blend in with the Crowd
This is known as “going gray.” Granted, becoming a gray man involves the next element of our list as well, but this is where it all starts.
Basically, the less likely you are to be noticed, the more likely you are to bug out without having to deal with the potential chaotic problem of other people. One of the best ways to ensure that you are not noticed is by wearing clothes that do not draw attention to yourself.
All the time, but especially during a disaster event, the brain operates along an instinctual pattern called the reticular activating system, or RAS. Essentially, this mental process is a background task your brain uses to identify potential threats in its environment. However, RAS quickly shifts from a defensive mechanism to an offensive mechanism when the need arises.
The temporary or permanent breakdown of society is one such situation when the need to offensively secure the means of survival will trigger the RAS to not simply identify threats but also potential resources (think Hurricane Katrina). As such, whatever clothing you can wear to stay off of people’s RAS will help you avoid them.
The primary thing to consider in this regard is avoiding clothes that are brightly colored. Whites, yellows, and reds all attract the human eye, because they are either uncommon in large blocks at ground-level or because they signal blood. Browns, greens, and grays, on the other hand, have a tendency to blend in with the general background.
Choose Routes less Transited by People in Your Bug Out Plan
One of the easiest ways to avoid people is to simply be where they are not. This can easily be achieved at a well-chosen bug out location. However, getting to your bug out location may present issues.
As such, most of your different bug out routes should avoid highly trafficked areas. It is fine to have one or two routes that use back roads or well-worn trails, but you should make sure that you have about twice as many routes that people are unlikely to use as you do that people might even consider.
In this instance, it can actually be beneficial to go out ahead of time and create bug out routes through otherwise unforgiving terrain. For instance, if your bug out location lays on a thick, wooded area, cut a small trail-no more than six inches to a foot, and only at leg level-into your path.
This will provide a relatively quick path for you when bugging out that is unlikely to be noticed by too many people. In fact, the people who may notice are likely survivalists themselves and should be similarly well-prepared.
Like our content? Share it on social media!
Further Reading:
- Gray Man Strategies 101: Peeling Away the Thin Veneer of Society | ITS Tactical
- Becoming The ‘Gray Man’: 10 Ways to Blend In and Survive | Real World Survivor
- Smart Strategies To Keep A Low Profile During SHTF | Prepper’s Will
PART TWENTY ONE
Bugging Out for People with Special Needs
It is an unfortunate state of life not everybody is equally abled, but that is simply the way it is. Sometimes this is due to natural conditions like age, while other times birth defects or accidents later in life may limit an individual.
However, just because someone may not be as physically capable as another person is no reason they should not survive a catastrophic disaster-especially if that person is important and meaningful to you or your family’s life. Still, this does not change the fact that limitations of party members can increase the risk of transportation when bugging out-especially if you have a long distance to travel on foot.
In these instances, it is important to have a plan that addresses the special needs of differently abled people in your party. In this instance, there are two primary concerns that need to be addressed and incorporated into any well-prepared bug out plan: movement and gear.

Consider Their Mobility, Sometimes is Better to Bug In
The ability to move quickly and without impediment is paramount during a disaster situation. Even minor hiccups in a well-devised plan can cause a cascading domino effect that places you and your party in a legitimate existential risk.
As such, when making your bug out plan, it is vital to consider ahead of time the mobility of every member of your party. Keep in mind, just because a party member might be somewhat limited does not mean that they will inherently be a drag on the party’s progress-especially if accounted for ahead of time.
For example, if the first section of your bug out path uses roads and the second section uses well-worn trails, there are buggies of all sizes to assist with transporting members that may have mobility issues. While this is most readily applied to infants and young children, it can apply to the elderly as well.
Moreover, these carts may actually be a bit of a blessing in disguise. Without mobility limitations, you are liable to take the “every person carry what they need on their back” approach. While this offers the greatest level of situational agility to change plans on a dime as the conditions change, it does require far more scrupulous planning.
However, it is far easier for a person to pull weight for long periods of time than it is to carry it. If you have family members that require assistance, their buggy can also expand the capacity for gear that the party can transport-just be sure that the gear is also packed and clearly designated in the event the buggy has to be abandoned.
Of course, not all paths are cart worthy and must simply be traversed on foot. In this instance, not every member of your party may be able to accomplish the task depending on where you are located and where viable bug out locations are positioned in relation to your starting location. As such, it might be a better idea to plan for bugging out right where you live.
Keep in mind, this will heavily depend on your geographical and atmospheric location-and the disasters you are likely to face. Some of those disasters are more easily planned for than others. Certain natural or man-made disasters can be mediated with preparation, while others cannot.
Some Advice on How to Adapt Your Plan for Relatives with Special Needs
In the event that the disaster cannot be planned for to ride out at home and transportation is a necessity, there are a few tactics that can alleviate mobility issues. The most prominent solution involves your bug out location.
You may be forced to pick a less than ideal location to accommodate some of the less mobile members of your party. If those members cannot make a multiple day hike, identify an acceptable bug out location that is closer to your starting rally point and makes use of more easily traversable terrain-like roads or well-worn trails.
If no such option exists, consider how the gear is packed to help some of the other members of your party who may not be able to carry much weight. For instance, while it is ideal that everyone carries what they need personally, it might work better for the party if the strongest member carries all of the sleeping gear and as much food as possible.
The sleeping gear and food are liable to be the heaviest and bulkiest gear required. As such, party members with limited strength and mobility may have an easier go carrying everyone’s clothes.
Of course, this does make losing a pack or party member far more dangerous since repacking on the fly may not be possible and losing an entire category of supplies creates significant risk.
Final Advice when Bugging Out with People with Special Needs
Finally, there are some levels of extremity that are simply too risky to prepare for. For instance, should there be an extended global catastrophic disaster-say an asteroid hits the earth and throws up a massive dust cloud, blotting out the sun and bringing a ten-year winter-a viable plan may not exist for everyone.
As painful as it might be, survival of your family-and even the species-is far more important than sentimental value. In these most extreme of circumstances, there may come a point where the hardest of decisions have to be made.
Keep in mind, the current longevity of people has only been a blip on the timeline of human history. Even without infant mortality and young children dying, the average life expectancy was only about 50 years old. Including the death of infants and children, it drops to 30 years.
As such, should a legitimately devastating disaster occur, the elderly members of your party may simply pose too heavy a load for long-term survivability. Despite the pain caused, you still need to have a bug out plan that does not include them if you are to ensure the survival of the rest of your party, in such a dire event.
Alternatively, you can do the best you can to provide them with a bug in plan. This will give them a chance to survive the disaster, depending on what it is, without exposing you or the rest of your party to unnecessary risk that could spell doom for everyone involved.
PART TWENTY TWO
Train Hard! How to be Fit and Ready for Bugging Out
Throughout the majority of these guides, we have focused almost exclusively on the items you need and the tactics to employ. However, none of those will do you much good if you are physically incapable of properly carrying them out.
When it comes right down to it, bugging out is a grueling process that often tests your physical endurance-potentially bringing you to a breaking point. Even with the best plan and gear, the chaos of a disaster scenario can put you in a dangerous situation without any good options-leaving you to simply choose the “least bad” course of action.
Of course, you need to be physically fit enough to be able to scale the mountain to save any time. Keep in mind, there are also situations when your physical fitness may ultimately save your life-like if you need to defend yourself or flee.

Have a Good Diet
Staying in good physical shape is about more than being thin or muscular. The way your body processes nutrients can play just as a vital a factor in terms of your health as your muscle mass. For instance, it is entirely possible for someone to workout like crazy and develop a chiseled physique while eating fast food and drinking carbonated beverages. It may be more difficult, but it is still possible.
However, that type of lifestyle will still impact your health, regardless of what you look like on the outside. Your liver and other organs will not be as healthy and your body could suffer once a drastic shift of dietary intake occurs.
For those of you who drink caffeine in the morning, consider how you feel when you do not drink coffee. Not only are you sluggish and irritable, you may very well suffer from acute headaches caused by a mild caffeine addiction. While it is not as widely publicized, you can have the same side effects when switching over from a high fat or high sugar diet.
Ultimately, those are the kinds of problems that can lead to mistakes when bugging out, and if you can correct them ahead of time, there is no reason to wait until SHTF. While there are various lists and diet suggestions available, the simple truth is to eat more fruits and vegetables than anything else.
Meats and dairy products can be good for you in moderation-just be sure to limit them before they begin to put a strain on your heart. Obviously, highly processed sugar should be avoided. It may taste good, but your body is actually not designed to process it.
Plan to Lose Weight (Get Help from an Expert Trainer)
Throughout the numerous guides we have provided, an inordinate amount of time has been spent figuring out how to lighten the load of your pack and gear. There are a few reasons for this, but the primary one ultimately has to do with transportation. When bugging out, you need to be able to move quickly and for extended durations of time.
However, what good will trimming your pack and gear down to the bare essentials do when you are lugging around a spare tire? That is why, unless you are already close to an ideal body weight, you should make it a point to lose weight. Part of this can be accomplished by following the aforementioned good diet, but depending on your situation, you may require a more focused and in-depth approach to fully tackle a creeping weight problem.
While few people like to admit that they need help, preppers first and foremost, it is important for the potential survival of your party that you acknowledge if you do need help losing weight. Keep in mind, there is nothing shameful about not being able to lose weight on your own.
Despite what self-help books might want to say, the human metabolism is an incredibly complex-and not at all standardized-process. As such, what works for one person may not work for another.
Unless you have a specialized background, chances are you do not know how to identify what idiosyncrasies could make losing weight a far more difficult process. In this instance, your best bet would be to acquire the services of a personal trainer. For these purposes, the individual should have some background in nutrition as well as kinesiology.
Train for Strength, Cardiovascular Endurance, and Flexibility
Beyond being physically trim and having your body accustomed to a proper diet, another important fitness component involves the physical limits of your body in short-term situations. Keep in mind, you are likely to find yourself tested to one limit or another while bugging out, so making sure your body is capable of meeting that test is vital.
The three main components of physical limitation you should train for are strength, endurance, and flexibility. You do not need to bring yourself to Olympic levels in any of these qualities, but you should ideally be at an amateur competition level.
Strength training should focus on the major muscle groups which are likely to be challenged. The chest, arms, legs, back, and core are all primary muscle groups which, when developed, can either make bugging out much easier or present their own impediments to an already difficult task.
Considering you may need to walk for multiple days-maybe even longer than a week-endurance is arguably the most important physical trait to develop. Ensuring that your heart and lungs can handle a full day’s load without constantly needing to rest should be considered a baseline-especially since bugging out can require various lengths of long jogs or even short bursts of sprinting to either make up time or avoid danger.
Flexibility is a bit of a two-for-one situation. Not only will enhanced flexibility allow you to traverse areas that might otherwise be off limits, it will also keep your soft tissues healthy under a normal load. Moreover, good flexibility will also promote the growth of blood vessels which will increase your cardiovascular endurance.
Do the Kind of Exercises that Will Help You Perform Better in a Real Survival Situation
Another important factor in being fit for bugging out is getting your body ready to do the types of tasks you will demand of it when bugging out. Being able to bench press more than your body weight might sound nice, but if that strength is not functional, then it does you no good. Building shelters with large pieces of found materials that require you to move them can be a great way to train developed strength into functional strength.
Similarly, when it comes to endurance, running a few miles every morning will certainly help build your endurance. However, when you bug out, you will likely be carrying anywhere from thirty to fifty pounds of gear on your back.
You will soon find that running without gear for an hour is a different beast to hiking with a full pack for days. As such, you should mix in extended hikes with full packs, so your body can develop both types of endurance.
Further Reading:
- Survival Fitness: An Introduction | Survival Cache
- Get Prepared Physically for Survival or Face the Consequences | Graywolf Survival
- Bug-Out Boot Camp | Ready Nutrition
PART TWENTY THREE
Bug out Vehicles: How to Choose a Good One
While we have stressed the ability to plan for routes and be able to bug out on foot, that does not mean that the use of vehicular transport is not a preferred method of travel, nor should it be ignored. However, by this point, you should already have your walking routes established and have traversed them a few times.
As such, it is still important to consider the possibility that you can use an automobile to help you bug out. This becomes even more relevant if you do not live in a densely packed urban center. In fact, even if you live on the fringe of a metropolitan suburb, chances are you may still be able to bug out in a vehicle-assuming you have an advanced warning and a solid rally point.

Versatility
It would be great if a vehicle could do everything: go off-road, drive fast, pull a ton, and get great gas mileage. Unfortunately, the laws of physics always make us choose which qualities are most important. However, there are a few ways that you can goose various qualities of your bug out vehicle.
For instance, aftermarket modifications are a great way to turn a vehicle that may have a few flaws when bugging out into an absolute monster. Numerous protective features that are bolted or welded onto the frame can increase its durability. Moreover, there are a number of ways to increase fuel economy-though these often require some advanced mechanical knowledge to accomplish.
Simpler additions can include a CB ham radio, various storage racks, secondary fuel tanks, and brighter lights. Moreover, some vehicles can even be retrofitted to serve as quasi-campers for multiple party members. Still, it is generally cheaper, if requiring elbow grease and knowledge, to make these changes after purchase rather than looking for a vehicle that comes pre-equipped with them.
Fuel Economy
During a major disaster, your bug out vehicle’s fuel economy may turn out to be one of its most important qualities. Keep in mind, even if the disaster does not actually wipe out a majority of gas stations or make them unreachable, chances are that the population will panic and make a run on gasoline. This can lead to severe gas shortages in a fairly short amount of time-as is evidenced anytime a major natural disaster, like a hurricane, hits.
As such, your vehicle should get as many miles to the gallon as is reasonable. Of course, this will be a bit of a balancing act considering that many of the most capable bug out vehicles will be both large and pack a solid amount of power. The heavier your vehicle-not to mention whatever load you may be hauling-combined with a powerful engine will ultimately decrease your vehicle’s gas mileage.
Another factor to keep in mind is that newer vehicles often get much better gas mileage than older vehicles. However, as mentioned earlier, newer vehicles are more vulnerable to EMPs, making them unsuitable for all disasters. As such, it might be better to rebuild an older vehicle and make aftermarket modifications to extend its fuel economy.
Neutral Color
Just as we have advised you to make yourself inconspicuous, we advise that you do the same with your vehicle. Of course, you will simply not be able to make your vehicle as inconspicuous as you can yourself, but there are still a few techniques that you can use to prevent people from a distance from easily spotting your vehicle.
The primary thing to remember in this regard is to avoid flashy colors that are not found in great supply in nature. Reds, whites, yellows, and blues all stand out when in large chunks. Greens and various shades of brown are far more likely to go unnoticed. However, your local region may make a yellowish tan more appropriate, like if you live in an arid region.
Capable of Driving Off Road
Right up there with a decent fuel economy and engine with great torque, the ability to drive off-road is one of the key elements of any worthy bug out vehicle. Keep in mind, with preparation for the unknown as the entire exercise, having to stick to nicely paved roads limits your available options when bugging out.
Aside from the fact that roads will likely be clogged with other people trying to flee, they increase your visibility. As such, you should ideally use bug out routes that avoid roads altogether if possible. This being the case, a vehicle that cannot go off-road will not allow you to make the best bug out plans in the first place.
One of the major features for off-road vehicles is its drivetrain. Any decent off-road vehicle will be four-wheel drive, meaning the engine delivers power to all four wheels separately at the same time. Even if the vehicle offers good clearance and you add off-road wheels, the absence of four-wheel drive will simply leave you stuck in the mud, spinning tires.
Ben Pittsley – Living Survival
Follow Ben: Facebook | Twitter 
When building an emergency kit for home or vehicle, I start with my B.A.S.I.C equipment. B.A.S.I.C is a system I came up with after years of putting together bug out bags and survival kits. B stands for Blade. Many feel a blade is the number one piece of gear every kit shouldn’t be without. A is for Aid. First Aid is an essential component of every kit. S stands for Shelter. A tarp, bivy or small tent is a great idea to keep you out of the elements should you need to exit your home or vehicle. I is for Ignition.
A lighter or two and some tinder in the form of cotton balls and vaseline is a great way to get a fire started quickly. Never know when you may need to cook food or warm up. Finally, C stands for Calories. Make sure to include a few high protein snacks such as beef jerky, energy bars or trail mix. In addition, you may want to add a Container for collecting and purifying water. Other essentials to follow would be a Flashlight or Headlamp, Compass, signaling device such as a Whistle or Mirror, Cordage, and Multi-tool. Start with the B.A.S.I.C and build from there!
Good Horsepower and Speed
As mentioned in the fuel economy section, your bug out vehicle’s engine needs to provide a good amount of power. However, this offers you a wide range of use when bugging out. For instance, if you are travelling to your bug out location and encounter a fallen tree on the road, an engine with solid torque will allow you to tow the tree out of the way and allow you to continue on your journey without having to waste the time, fuel, and visibility of making a detour.
Moreover, a vehicle’s ability to go off-road is not defined entirely by its height, wheels, and its drivetrain. Even if all of those qualities are designed to go off-road, your engine still needs to be able to produce the necessary torque to push your vehicle through mud or water. Still, torque is not the only quality to look for in a bug out vehicle’s engine.
Acceleration and top speed may not be as important as the engine’s ability to deliver sustained power, but they should not be ignored either. If something happens where you and your party need to evacuate quickly, your vehicle’s acceleration-especially around turns-and its top straight-line speed will both factor into its effectiveness at beating a hasty retreat.
Reliability
This is an important factor for any vehicle-not just those used to bug out. However, it should not necessarily be seen as the most important quality. Granted, there is no real use in having a junker for a bug out vehicle, but the chances of you using this vehicle for long stretches of time are minimal-assuming you devise your plans appropriately.
Assuming your bug out vehicle can travel for thirty to one hundred miles-in case you need to take numerous detours-without running the risk of serious malfunctions, your vehicle should be fine. Of course, it is always better to use a vehicle that offers a simpler design, so you can more easily make repairs or do routine maintenance should the situation arise.
Ultimately, if you keep your bug out vehicle in top condition when everything is good, it should be able to handle bugging out when everything else around you falls apart. It is also advisable to keep a number of spare parts that may fail when the vehicle is pushed just in case.
Good Hauling Capability
Your bug out vehicle should ideally be able to haul a trailer or camper behind it in a pinch, this also allows your vehicle to haul a separate vehicle-either belonging to another person or perhaps more specialized for a separate leg of the journey.
However, this feature should also include the amount of gear and number of party members the bug out vehicle can carry as well. It is this reason that smaller off-road vehicles are not nearly as popular for bugging out. Sure, they may be great at getting around, but unless you are going by yourself or with one other person, they will not do much good.
If your current vehicle does not offer hauling ability, consider an aftermarket modification that allows it to at least tow a small trailer. Keep in mind, a small trailer can both carry supplies and be used as the base of a shelter.
Further Reading:
- 10 Things to Look for When Picking A Bug Out Vehicle | Reality Survival
- Best Bug Out Vehicles: What to Look for and Options to Consider | Survivor’s Fortress
- Bug Out Vehicles: Lessons Learned From These Badass Setups | Skilled Survival
PART TWENTY FOUR
Bugging Out with Your Pets: Things to Consider
An often overlooked aspect of bugging out is what to do about your pets. Considering sixty to eighty percent of all people in the United States own some kind of pet, it is more likely than not that fall into that category. If you do not have a pet, this information can still prove useful if you get one in the future or have a party member who does.
One thing to keep in mind, chances are your pet will not be able to contribute to its own needs when bugging out. Granted, some exceptions to this rule include large dogs, but even they are fairly limited. As such, it is vital that you understand what bugging out with a pet entails.

If You are Considering a Pet, Get a Dog
Of course, not all pets are dead weight when bugging out. In fact, medium to large dogs can be valuable party members that not only pull their own weight but can contribute in ways that the other members of the party simply cannot. In fact, if you do not already have a pet, it can be a beneficial part of your bug out plan to get and train a large dog for bugging out.
Keep in mind, dogs were the first animal domesticated by humans, and they actually domesticated themselves more than us domesticating them. As such, dogs are genetically predisposed to follow human groups and commands. Moreover, dogs are already built for making long journeys over dangerous terrain. Of course, not every dog-even every large dog-is presently capable of bugging out.
Most pets are not habituated to the types of tasks required for bugging out and are every bit as incapable as their respective masters. That is why if you do have a dog, there are numerous behaviors to train.
Your dog needs to know how to alert the party to potential danger but also how to stay quiet when the need arises. Moreover, any hunting, tracking, or foraging skills allow the dog to not only pull its own weight but contribute beyond its needs.
Of course, the ability to attack and protect both the camp, party members, and supplies is also invaluable-just make sure the dog will not attack without clear signs or commands that it is necessary.
Alan Urban – Urban Survival Site
Follow Alan: Pinterest | Twitter | Facebook | Google+  If you’re planning on taking your dog with you when you bug out, consider making a separate bug out bag for your canine companion. A bug out bag for a dog should include things like collars, leashes, ID tags, chew toys, vet records, medications, pictures (in case he/she is lost), at least three days of dry pet food (cans would be too heavy), and collapsible food and water bowls. A strong dog can carry most of these things itself with a small saddlebag.
Sometimes The Best Decision for Your Pets is to Euthanize Them
If you are unwilling or incapable of shouldering the additional burden of a pet that cannot pull its own weight and contribute to the party, there are a few tough choices to make. Keep in mind, the circumstances of the disaster can influence this decision, so weigh those factors carefully.
If you are bugging out for a short period of time and your home’s foundation is unlikely to be at risk, you can fill the sink with food and water and let cats ride it out. However, anything longer than a week or two will prove deadly to this scenario.
As such, if you are bugging out for good and do not intend to take your pets, the most merciful thing to do is euthanize them. This may sound harsh, but the alternative to euthanasia is often starvation or dehydration. Those two methods of death are far more terrible and entail greater suffering than a quick, merciful death.
Like our content? Share it on social media!
Conclusion
 At this point, you now contain enough tips, tricks, and resources to develop a full, comprehensive bug out plan. While this guide did not necessarily cover every possible facet of bugging out in exhaustive detail-something for which numerous books already exist-we hope that you learned what many of the most important plans and things to consider when bugging out are.
If you have been paying attention, there should be a handful of principles that stand out and run through the majority of these guides as a running theme. First and foremost among these principles is to spend as much time as is necessary developing as comprehensive a plan as possible.
When creating a bug out plan, it is not enough to have an expertly organized pack with the best gear. Nor is an ideal bug out location with numerous routes and stashed caches sufficient. The best form of preparation is the kind that never ends. This may seem a bit daunting-especially after everything we have already said-but it is true.
You should constantly go over your plan, looking for even minor ways to improve it, new routes to add, possible conflicts that can arise in the field, and ways to overcome whatever the world may throw at you. Moreover, a perfect plan still requires continuous practice to ensure that it can be carried out without issue.
If you prepare, get yourself in shape, and practice bugging out to perfection, then stop and take a six-month break, guess what? You are no longer prepared. Sure, you may still be better prepared than someone who has not even considered this scenario, but much like any task or set of tasks, preparation is all about responding as quickly and coherently to a threat as is possible.
If you get everything ready and simply sit around waiting for a disaster to strike, once the time comes, you will not respond as quickly and your actions will not be as effective. That is why even once you have an exceptional plan and practiced numerous run-throughs with different threats and solutions, you must continue to do so again and again.
Hopefully, you found this both an informative and entertaining read. We are not suggesting that everything which can be said about bugging out has been said here. That is why we encourage you to post your thoughts, tips, and even corrections in the comments below. As always, stay safe and good prepping.


An excellent resource I have found on bug out bags is a book called, “Realistic Bug Out Bag, 2nd Edition: Prepared to Survive” by Max Cooper. This book is huge (620 pages) and covers a very wide range of topics to include 30 scenarios and 10 drills to increase your chances of survival. Well worth checking out. I found it complete and insightful.
https://www.amazon.com/Realistic-Bug-Out-Bag-2nd/dp/1548922994/
Thanks for the comprehensive list. I’m an avid backpacker so one of the things I find interesting and easy about preparing a bug out bag is that many of my backpacking supplies overlap with my prep supplies. This makes it easy to move things around as needed and always have the right supplies on hand, especially if I haven’t gone backpacking in a while and I can keep that stuff in a BOB. Some things like blades and first aid kits I buy two (or more) of, but a few things like a tarp or rainfly I can switch from bag to bag as needed.